Our favorite tool for managing and creating websites (especially blogs!!) is WordPress.
We found over the years, we kept getting asked the same questions over and over by friends and thought it would be fun to put together a ‘complete guide to WordPress for Newbies.
How Complete Is This Guide?
While, we feel we covered the vast majority of what you need to know. This guide is by no means “complete” – if you feel we should add something feel free to reach out. It is still growing and we are always trying to update it as often as possible
Here are the reasons why we love WordPress:
- It is very easy to use
- Over 30% of the internet uses it. That is more than 74 Million Sites!
- Since it is so popular, there are lots of people to help you. For example, it is very easy to find a programmer for customization.
- Lots of themes, so you don’t have to design your website, you buy a premade shell with all the HTML & CSS done for you! Meaning if you learn how to use WordPress, you can have a beautiful looking website within a hour.
How To Install WordPress
Alright then, so we have a little bit of a lazy answer for this one.
You shouldn’t install WordPress 😀
Its annoying, it’s a bit complicated, you have to set up a database, its time consuming. We suggest buying hosting that has it pre-installed, or can quickly install it for you. Myself and all my friends who professionally work online, have not personally installed WordPress in at least 5 years. Why should you?
If your current hosting doesn’t do this for you, we suggest changing your hosting provider. If they don’t offer it for free, it most likely means they are not the highest quality hosting and you should change :-O
How To Log Into WordPress
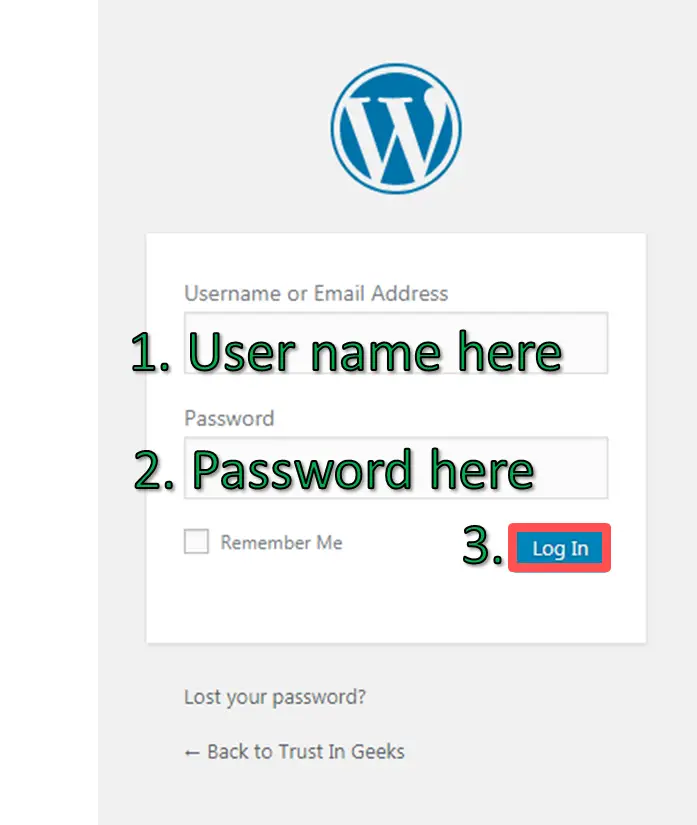
Once you have WordPress installed, it is pretty simple to login. You have to add a “/wp-admin” to the end of your domain name.
For example:

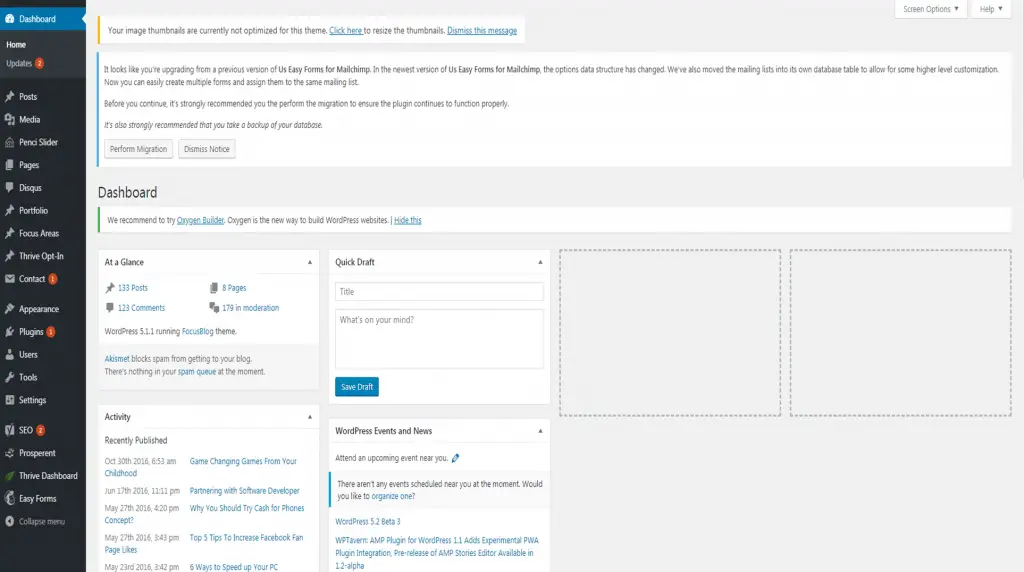
Once you do that, you’ll be brought to this screen, enter your user information:
Change WordPress Menu and settings to Different Language
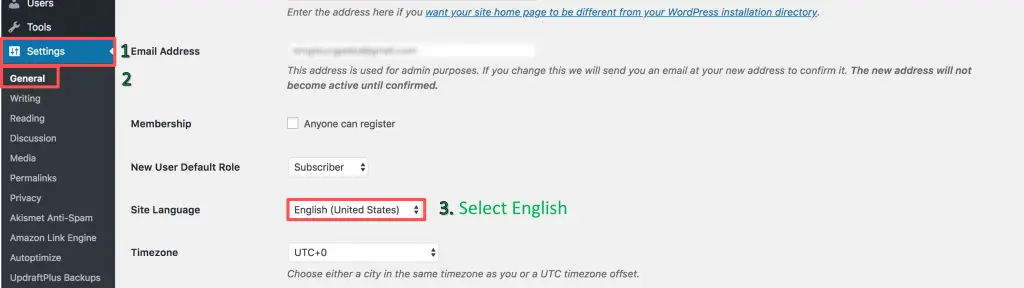
If you have not done so already, you can easily change your WordPress installation into English.
Select “Settings” On The Bottom left hand side.
At the bottom of the screen, don’t forget to press “SAVE CHANGES”
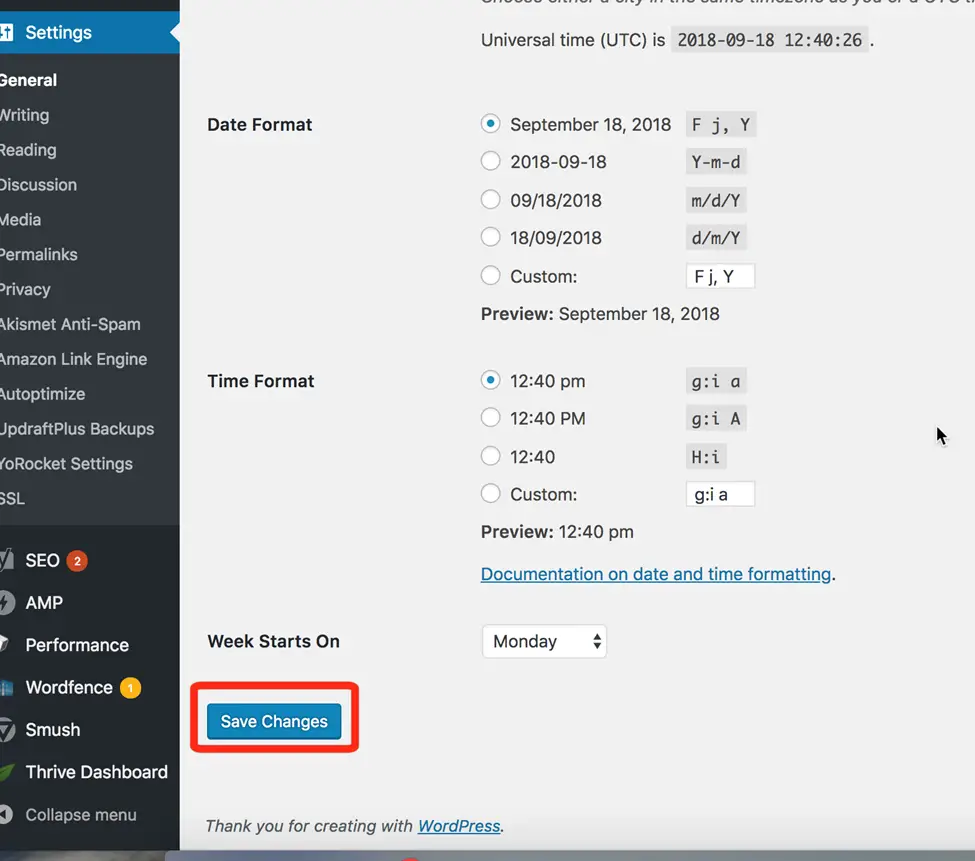
And BANG your WordPress dashboard will be in English:
WordPress Themes and Plugin Tips
A Theme is just the ‘look’ of a website. Basically the outer shell, the styling, the font, everything that makes it look pretty. WordPress calls this the “Theme”
The main advantage of WordPress themes is that all the hard stuff is done for you. All the HTML, all the CSS, javascript, etc. are done in advanced with just a few clicks of a button. So you don’t have to worry about programming!
For example, here are a few different themes:
Free and Open Source vs Paid Themes
Like anything in life, there are ups and downs to everything. The main advantage of free themes is their cost, however they are not supported. Meaning if you have a question, you can’t ask anyone.
Paid themes are supported and have A LOT more functionality. However they are not free.
Let’s go over the main advantages and disadvantages of each:
Advantages of Paid:
- Support. If you have a question, you can ask someone.
- Usage is Unlimited, for the most part, you can buy 1 and use them on as many sites as you want.
- Look more professional.
- Refund policy, most companies will give you back your money if you don’t like their product.
- They are well maintained and constantly updated. Making them hard to hack into.
- They often easily integrate with lots of other marketing software, such as Aweber, mailchimp, Facebook, Twitter etc.
- Have a lot more options, for example you can buy a theme specifically built for your business. If you want to own a restaurant, buy a restaurant theme. If you want to become a blogger, buy a blogging theme. If you want to open an eCommerce store, buy an eCommerce theme.
Disadvantages:
- Not free. As we say in America, you get what you pay for.
- Support is typically in English. We’d suggest just using Google Translate, its pretty good nowadays!
Advantages of Free:
- They are Free 😀
Disadvantages of Free Themes:
- You get what you pay for 😛
- No support. If you have questions, you have no one to ask.
- Free Themes are often made by individuals, as opposed to small businesses. They are not always well maintained. Meaning the software can go out of date. Or the developer might quit working on the project entirely.
- Often hacked into. They often have a lot of free users, meaning, if a hacker finds a vulnerability, they can exploit thousands of users. Do you want to be one of those users?
- If you are not a professional software developer, they are often hard to customize.
Here are our paid theme recommendations:
- Elegant themes? divi.
- Thrive Themes
- Themeforest (Lots of Random Themes made by individuals, as opposed to small business that is well supported. It is kind of like the Amazon.com for cheap website stuff)
**If you purchase a theme though our Links above, we will try and help you with any English support issues. At the very least, we can tell you how to write your question in English.**
Free Themes:
- Your current WordPress installation on your website should have a few already installed. Just pick the one you like the best.
Simply pick one, in a moment we will teach you how to install it.
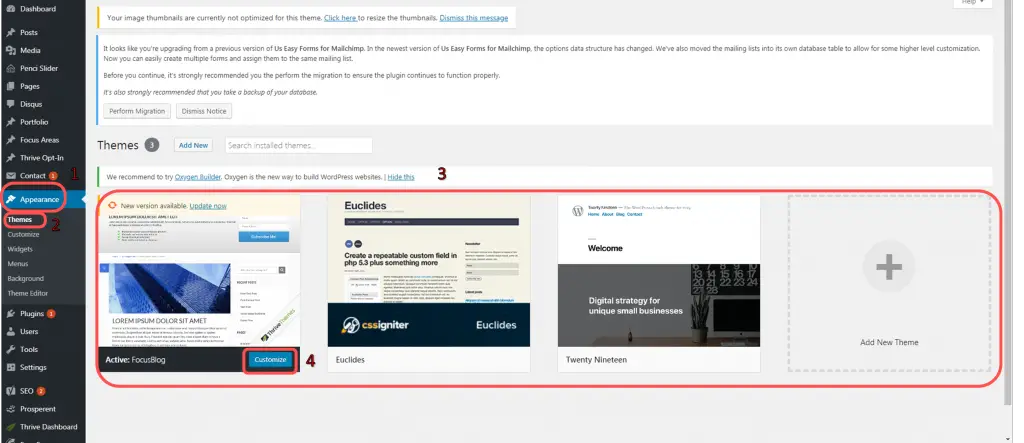
Here is where they are located:
Then pick the one you want.
A quick note about 3rd party themes:
Every theme is a little bit different. However they are all installed the same way, if you get lost and your theme is a little bit different than ours. Don’t freak out, contact their support, it is what they are there for.
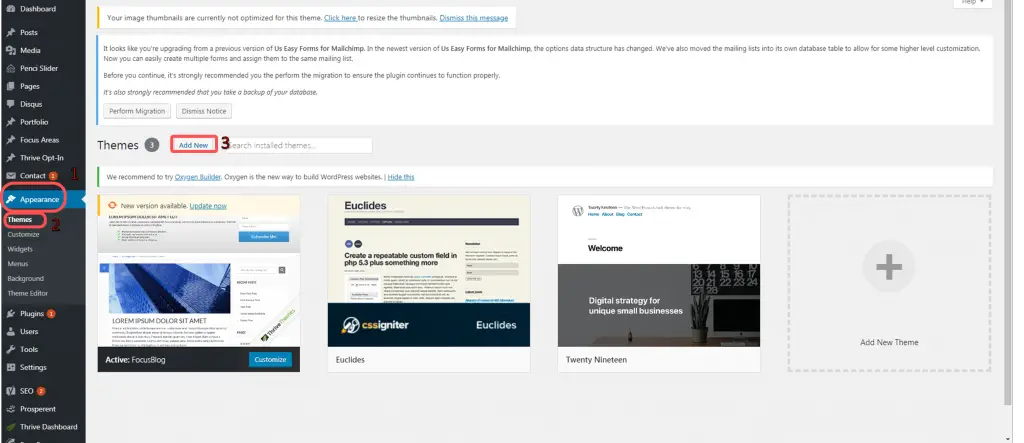
After you have downloaded the theme you like, installing them is pretty easy.
Follow these steps:
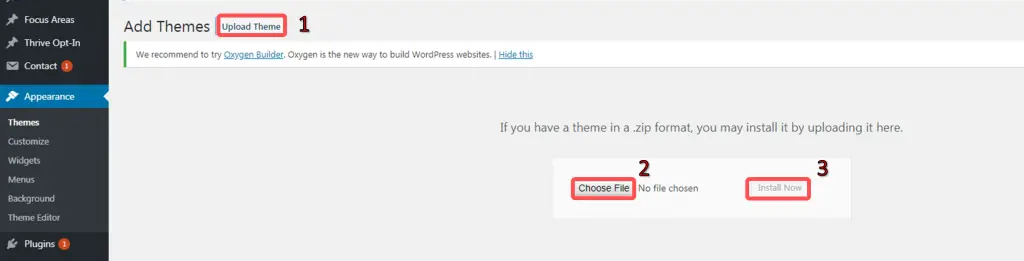
On The Next screen click >Choose File >
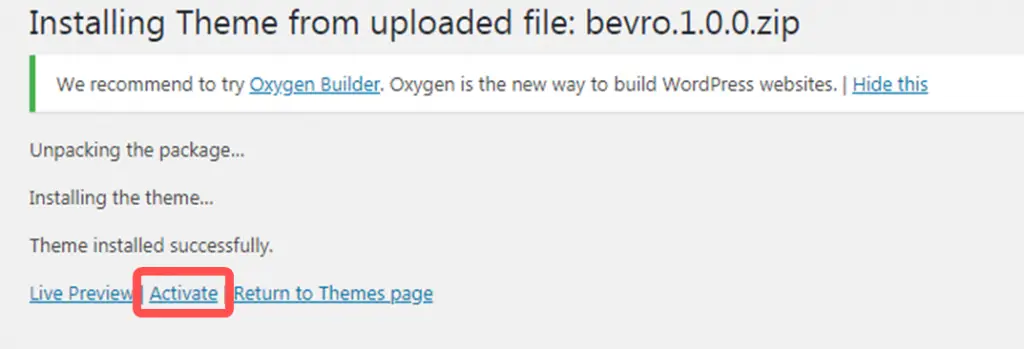
Important note: Only Upload a .ZIP file. Sometimes when you download a theme, it automatically “unzips.” If that happens, zip the file then upload it.
you can click “Activate”
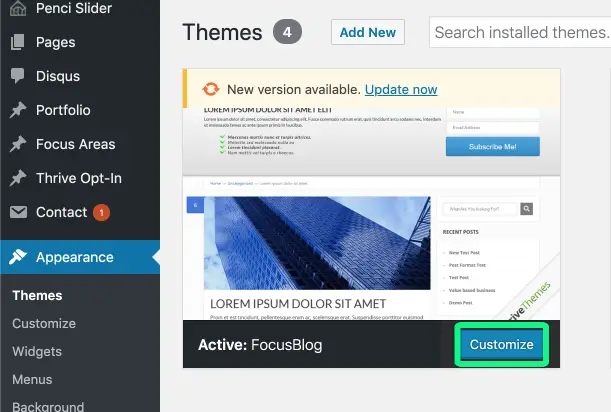
Click “Customize”
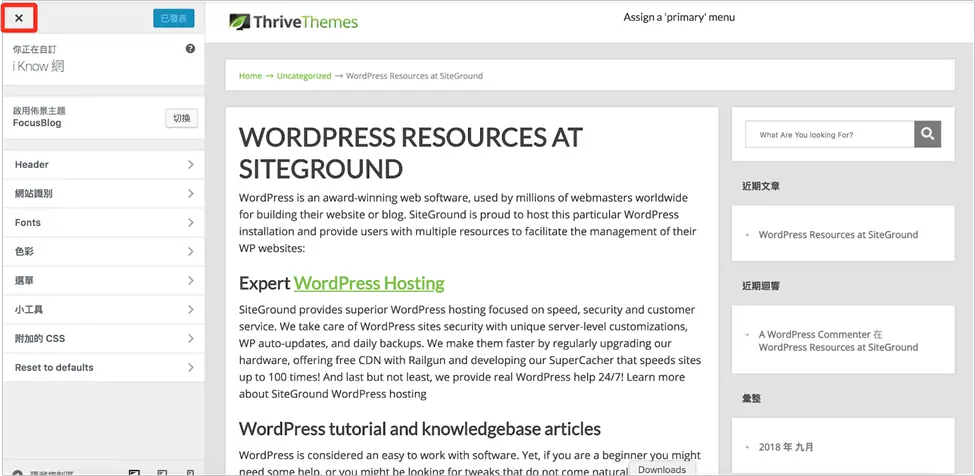
Once it’s installed, you’ll probably see a screen like this, just click the “X” and go back to the main dashboard.
If you see something different, don’t freak out, just go to the main dashboard again
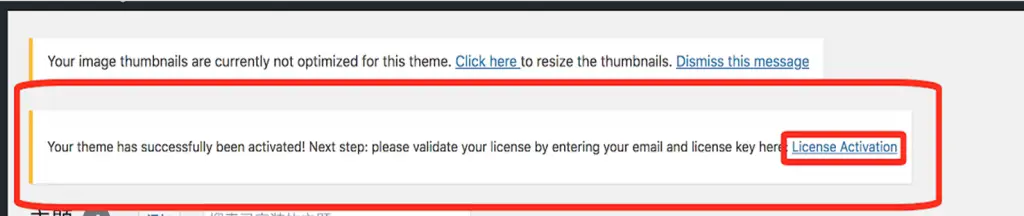
Finally, most likely their will be some kind of step to activate the theme. There should be a pop up towards the top of your dashboard. Simply follow their steps to active the theme.
In my case, I purchased a Theme from Thrive Themes and they displayed the “License Activation”, so I’m going to click that and follow their directions to active the theme.
This is different for every theme, if you get stuck, you’ll have to ask the theme providers support.
Most Likely, all the information you require was mailed to you.
Theme providers do this, to prevent theft.
For example, Thrive Themes simply has you enter the email you signed up with and the key in these locations:
For example, Thrive Themes simply has you enter the email you signed up with and the key in these locations:
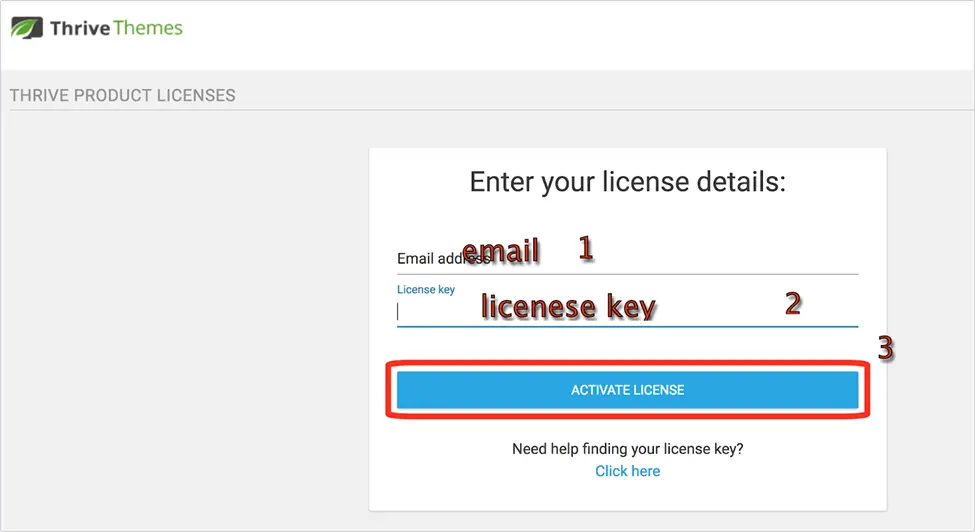
- License key -> Activate license
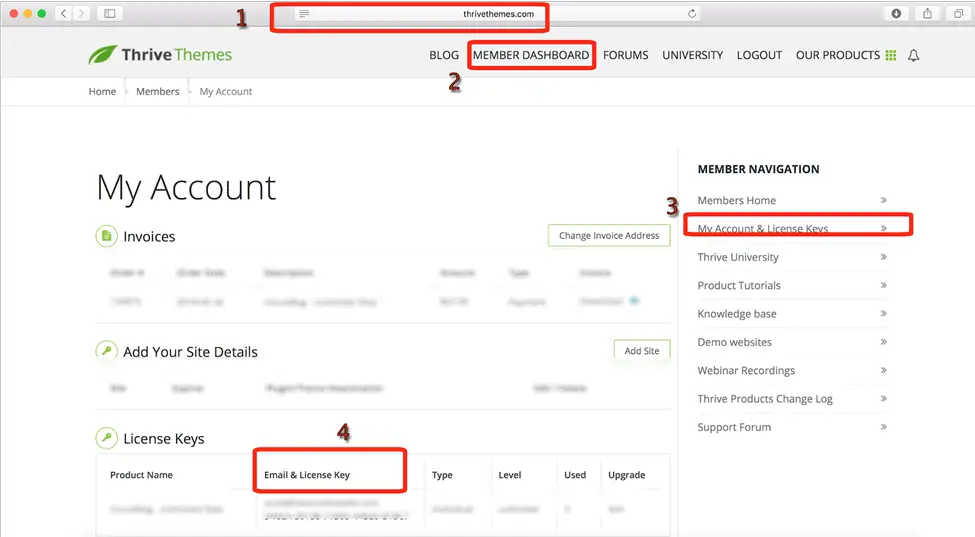
Again, the required information was probably emailed to you. In my case, I just logged into the thrive dashboard to retrieve the activation key:
Go to ThriveiveThemes.com > Member Dashboard > My Account & License Keys
If you used a different Theme company, this would be different for you.
Now your theme is installed!!
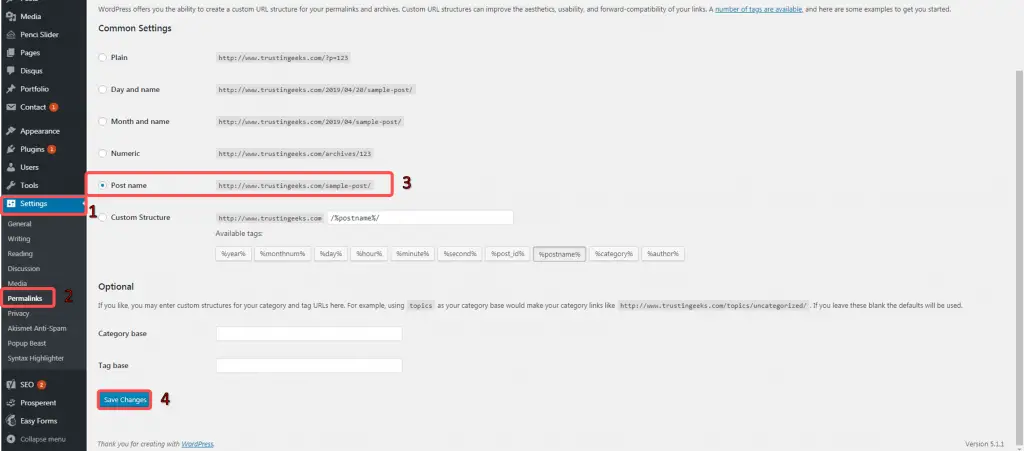
URL: How To Change it for eCommerce and Your Blog
Next, let’s set the URL path. The main benefit here is that Search Engines, such as Google, will better understand what your page is about. While there’s more stuff you have to do, this is one of the basic things We Have to take care of.
Here are the things you have to click on:
Page Vs Post? Which is More Ideal For Your Blog?
The difference between a page and a post is pretty simple, but at first it might be a hard concept to get your head around at first.
A page is static. Although you can change the content if you’d like, it is typically something that never changes. For example, a “contact us” page is well… a page. It is a page on your website that rarely changes.
Meaning, if you wanted to create a “Contact Us” section, you’d use their page setting.
Here is a contact us Page from Nike.com:

Again, something static, something you do not change very often on your website.
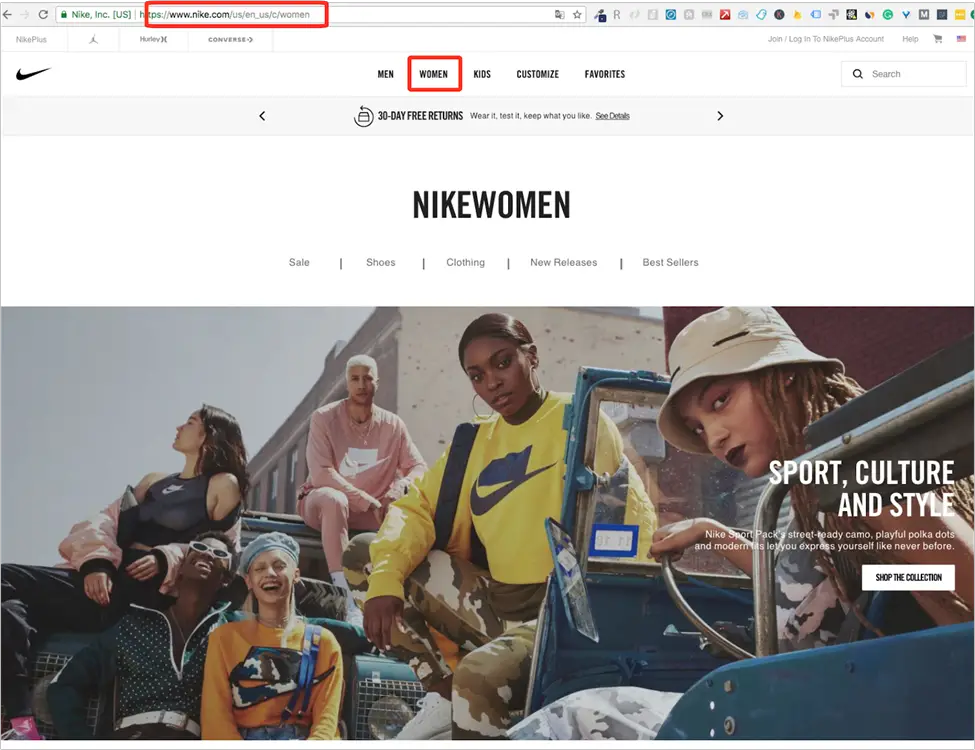
Another usage of pages is “something that usually goes in the menu of your site.”
If we keep looking at the Nike site, here is their “Women” page. Its a page that is dedicated only to women’s products.
Publish An Article or Post
A post on the other hand, is something you use more for your blog.
For instance, if you wanted to write an article for your website, you’d use a post.
If you wanted a permanent page that would be in the menu of your site, you’d use a Page.
The benefit of a post is that you can group them by a category. Making it very easy to organize content on websites.
They are both pretty similar, but their subtle difference make it much easier to organize your website. If you recall, WordPress is a “Content Management System.”
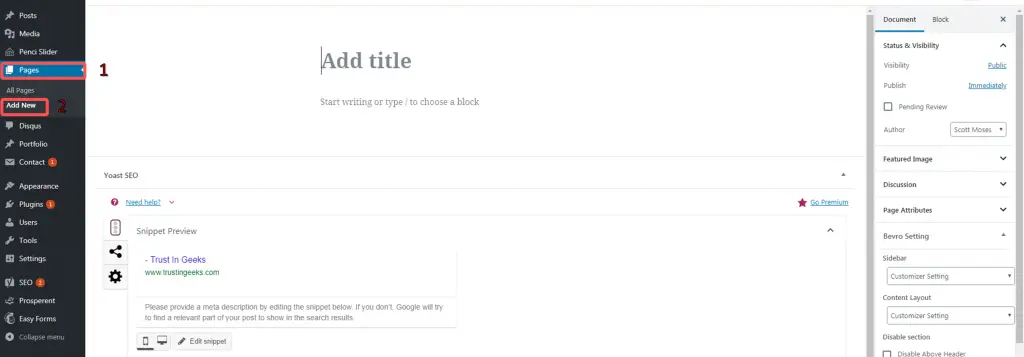
Creating a page is fairly easy. All you have to do is click:
There is quite a few more options, however let’s get into it at a bit later.
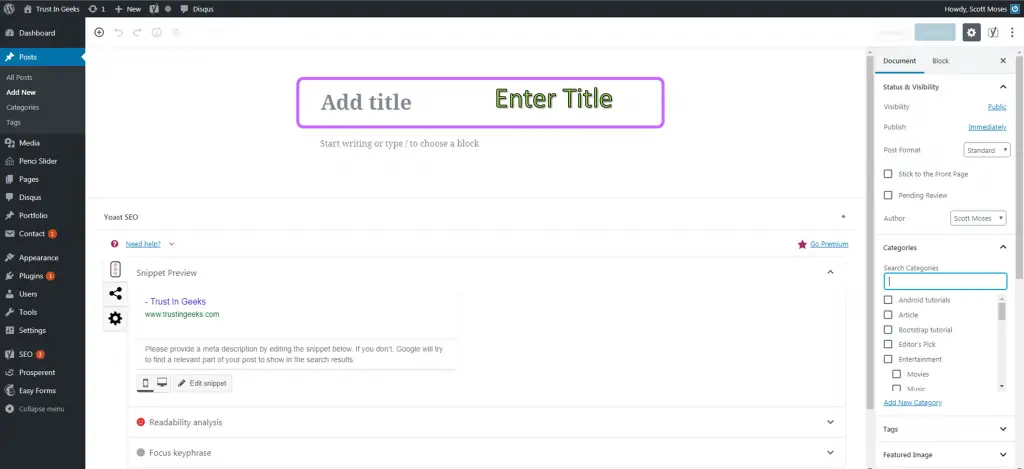
Creating a post is very similar to a page. Simply go to:
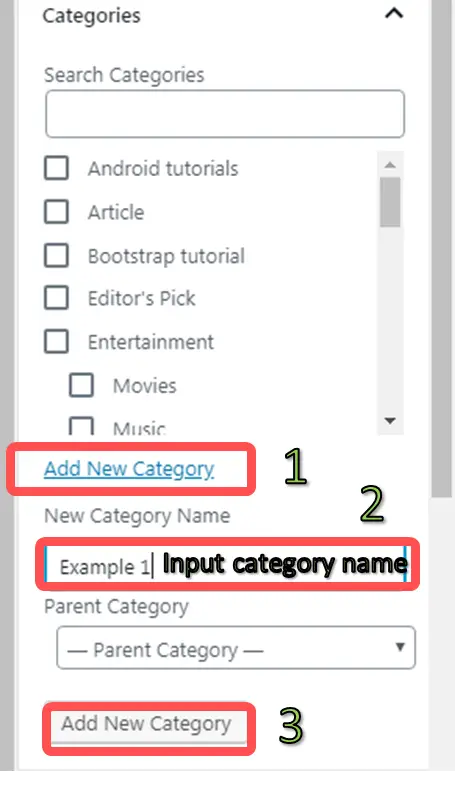
You’ll notice, with posts there is a section to create “categories”
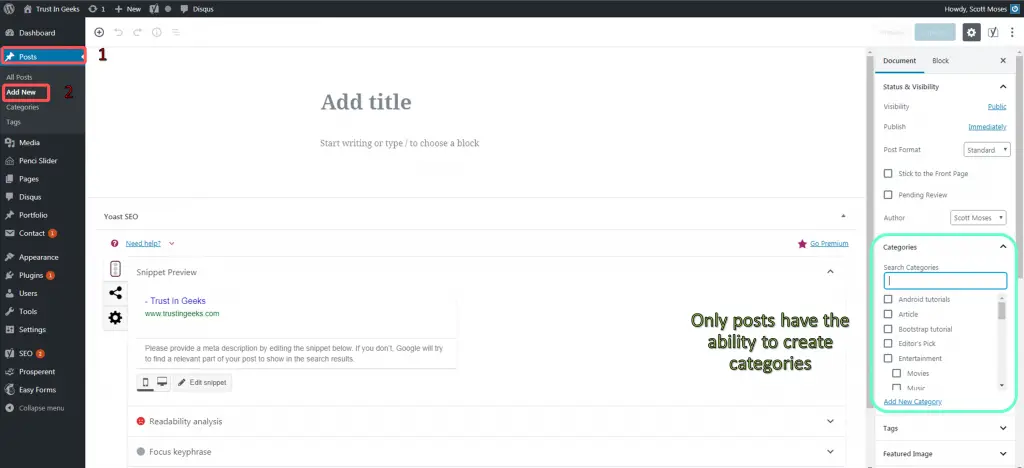
To create category: > Input Category name >
What Are Categories?
Basically, it is a way to organize your posts.
For example, let’s say you have a fitness site. You can give your posts the following labels:
- Weight lifting
- Diet
- Cardio
Allowing you to easily group your posts together. For example, if someone wants to learn more weight lifting tips, they can look through your “weight lifting” category.
Creating Content and Content Management
Now that you have created a few pages and posts, you’ll notice the the writing interface is pretty similar to the writing program Word.
Since it’s pretty similar to Word, I’d prefer to focus on the functions that are harder to use.
We’ll start with the overview image below to show you how to:
Enter a title and switch to their html builder.
I’ll include another button that is pretty important and easy to miss. It is called the “Kitchen Sink.”
Change Font Size And Heading Tags Without a Plugin
This is pretty important for formatting your articles. It helps show that certain parts of your article are more important than others.
WordPress has a lot of headline options.
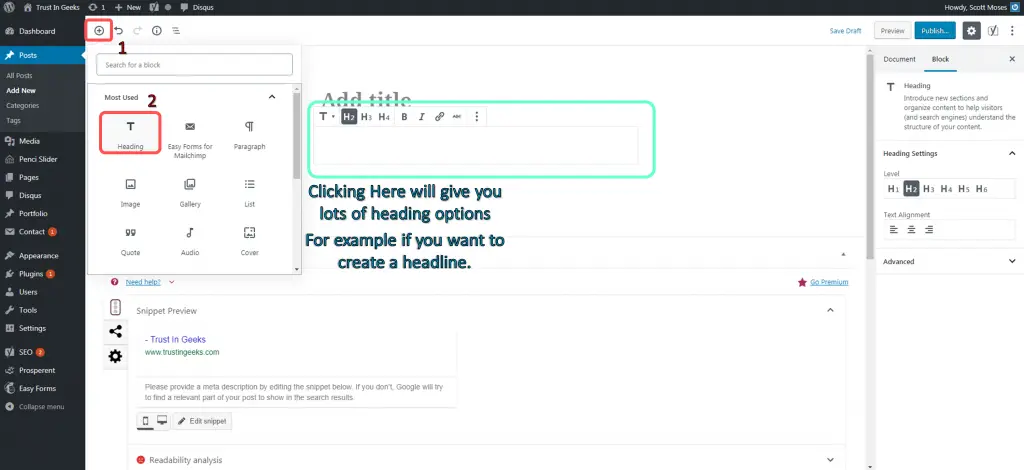
Typically the more important something is, the bigger heading you’ll give it. For example if it’s very important you might give the text heading 1 or heading 2. If it’s not so Important, you can give it a heading 3 or 4.
See this Picture as a quick example:
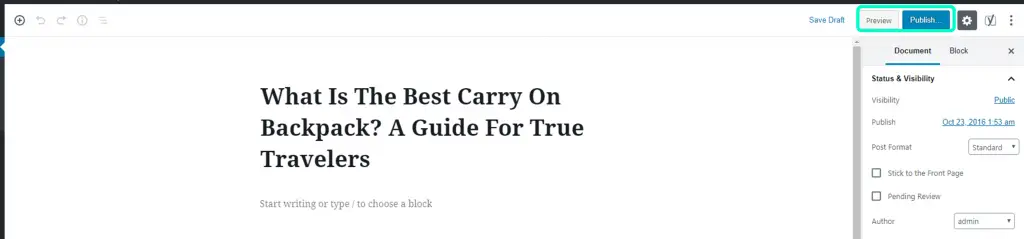
Publish Page / Posts in WordPress
You’ll notice on the right hand side, there’s quite a few options to save or publish a page or post.
You can save as a draft while you are writing the article. There’s even an option to set the publish date. For instance, if you want a post to be published 1 week from today, they have the functionality!
More importantly this is also a 「preview option」 Which is very helpful if you are proof reading a post and want to see what it looks like before publishing it.

How To Create A Link In The Website Builder
This is actually pretty important, it allows you to reference other pages on your website or other peoples website.
Here is a quick example from the New York Times, notice how they cite other resources available on the internet?
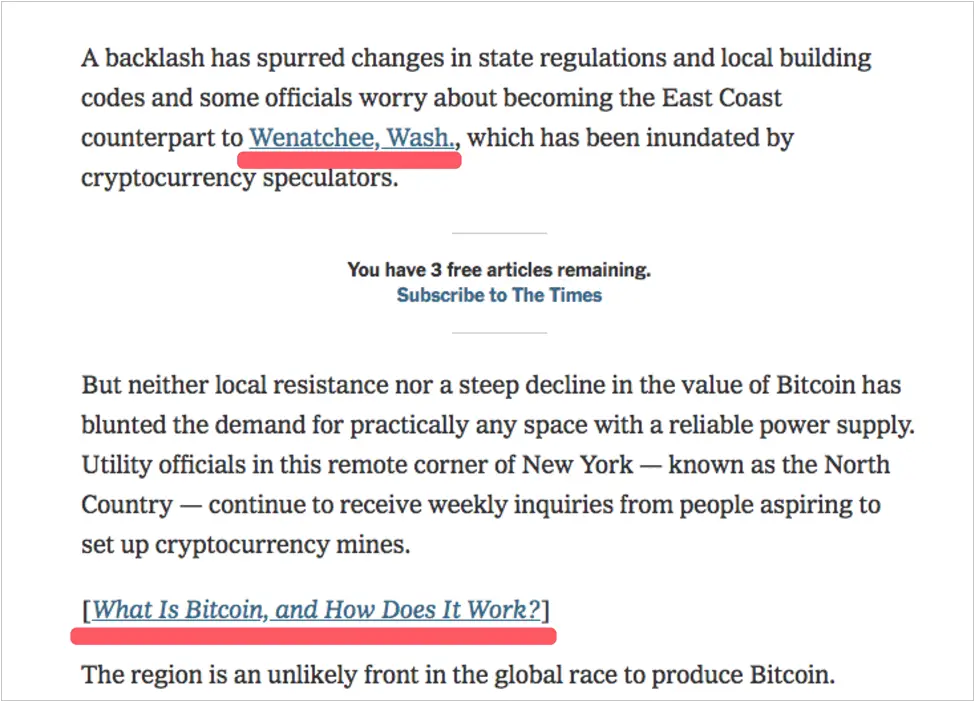
For instance if you are writing a brand new article, you can cite a source by linking to the website where you got your information.
Another usage, is to cite an older post on your website for additional information.
Readers really like this kind of stuff, it helps them engage with your content more.
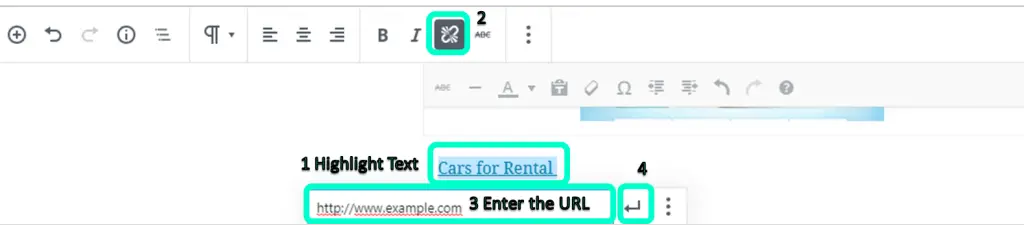
To create a link simply highlight the text you want link up, click the “link button”, enter your URL and click the submit button.
Adding Media Tool
To make your content more engaging, you can add images or videos. Thankfully, WordPress makes this pretty easy!
Images
Important Note: Where should you get your Images?
We would never suggest stealing images from other sites.
Here are your options:
- Buy images
- Take your own pictures
- Use creative commons images.
Important Note About Images
Keeping in mind we are not lawyers, we suggest using “creative commons images” and buying images if you can’t find something good.
For example, the website pexels.com offers completely free images under the CC0 license.
Here are a few popular websites that offer completely free images:
How To Add Images Widget
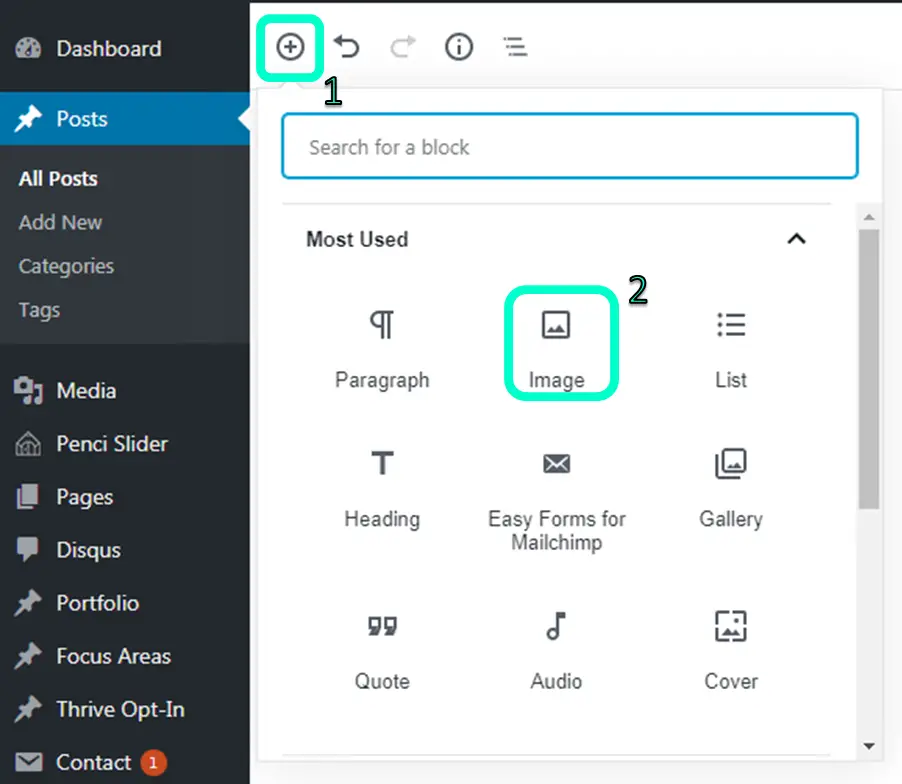
To add an image, on a page or a post, simply click on the “+” button, and then on the image button:
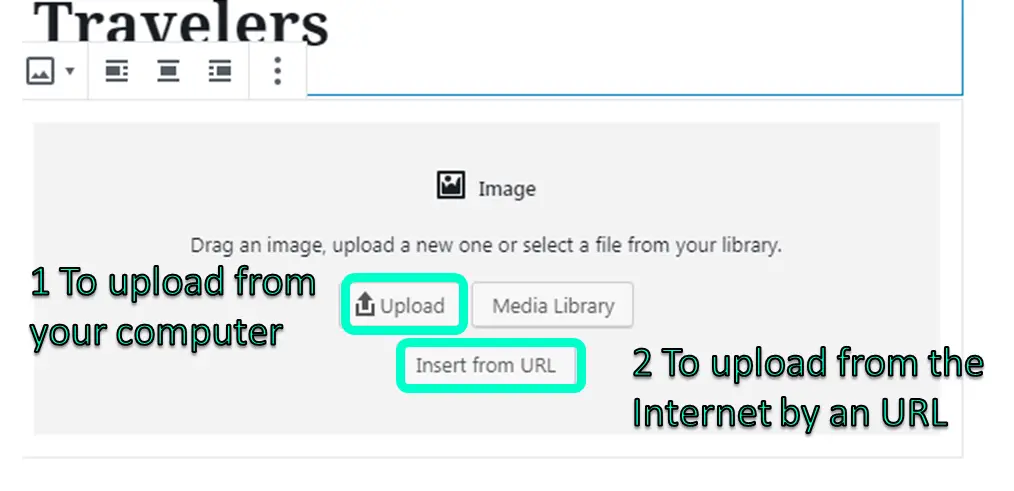
Next click: Upload > the image from your computer
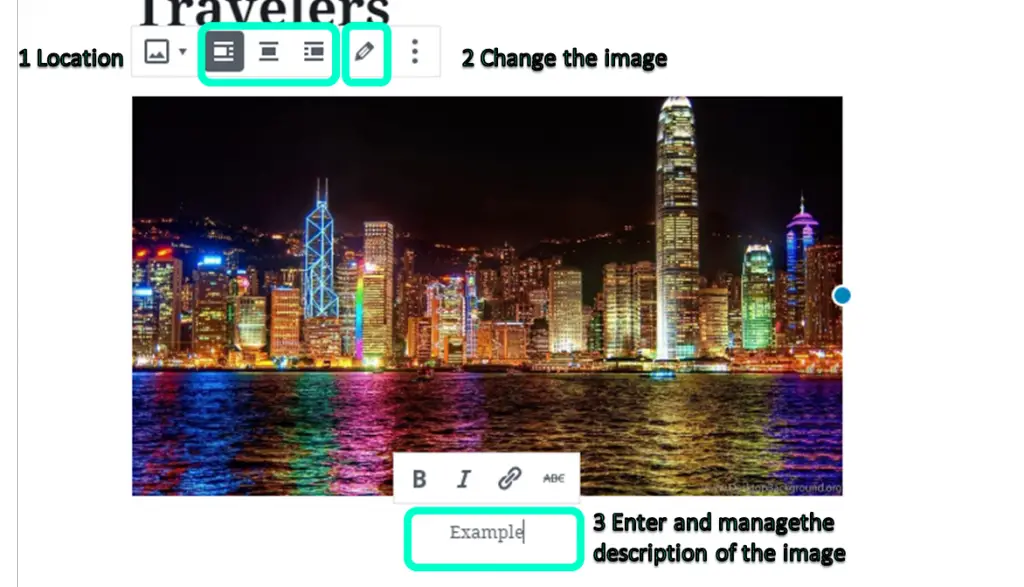
Next on the upper side, you can manage the location (i.e. pan to the left, right or middle), and on the box below you can write a description for your image.
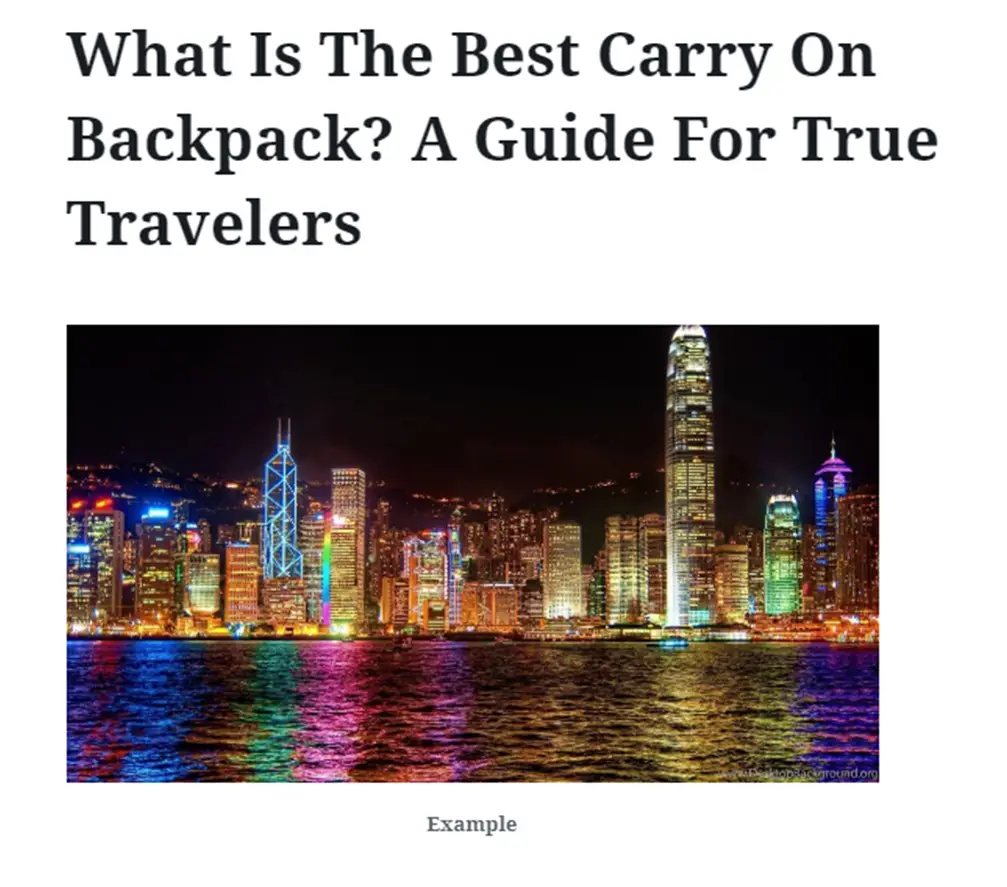
And bam! You have an image on your site:
Add A Featured image (in the WP Sidebar):
A featured image is the main image the represents your blog post. For example, if you set up your home page to show your most recent blog posts, it is the image that will be shown next to your content.
If we use our New York Times example (A WordPress user) Here are the a few featured images on their homepage:
In short, a featured image is a way to make your post display a bit more beautifully when grouped together.
To Add A featured Image, on the bottom right hand side just select > Set Featured Image:

And follow the same steps you used to upload a normal image.
Embed Videos:
Good news This used to be pretty annoying to do, if you didn’t know HTML. However, WordPress upgraded to use oEmbedTechnology. Meaning, if you want to embed a YouTube video or something similar, you just need to paste the YouTube URL into your blog post. That’s it!
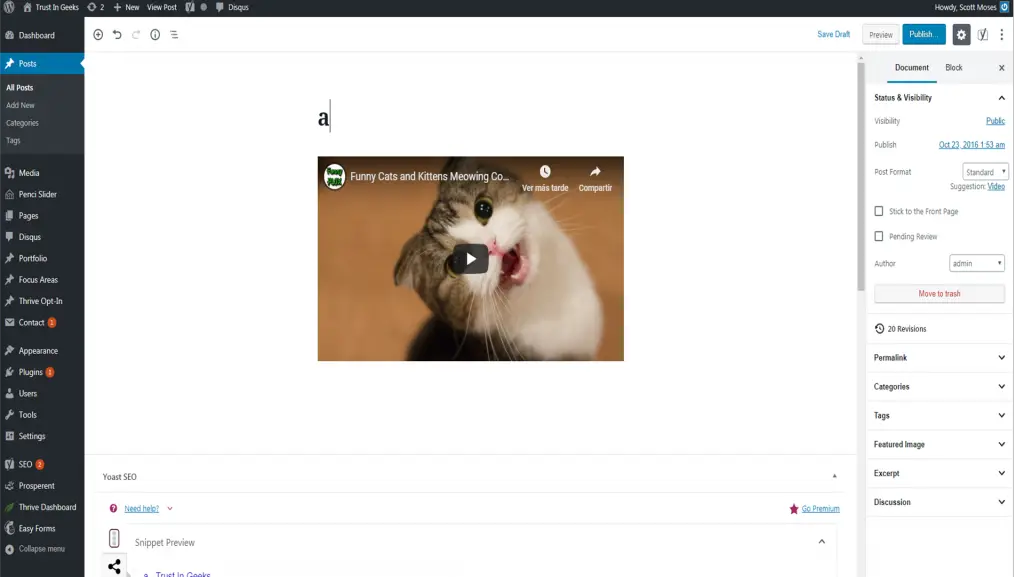
First, go to your favorite Video provider and copy the URL:

Then simply paste the URL into your post or page and wait a few seconds. It it doesn’t work automatically, simply save the post or page as a draft.
You can use this method for any of the following providers:
- YouTube
- DailyMotion
SetUp WordPress Menu
Okay, to learn how to set up a menu, for practice we’ll put 3 items in the menu.
Let’s plan on putting the following in the Menu:
- Home Link
- About Us Page Link
- Contact us Page link
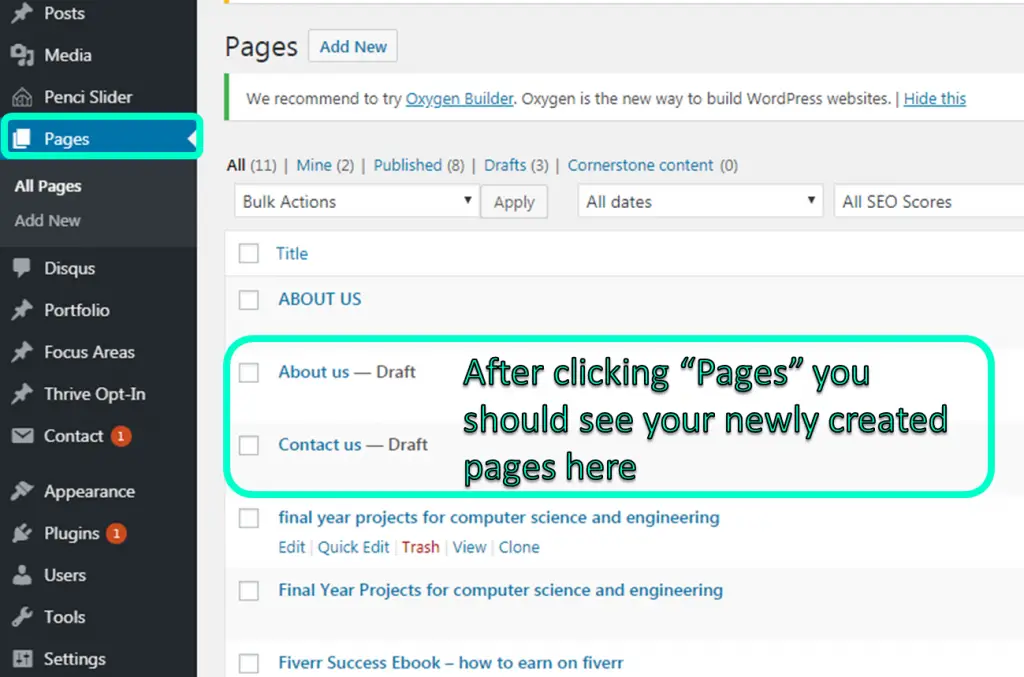
Take a moment and make these two pages:
- About us
- Contact us
If you have created them correctly, you’ll see them in your page menu.
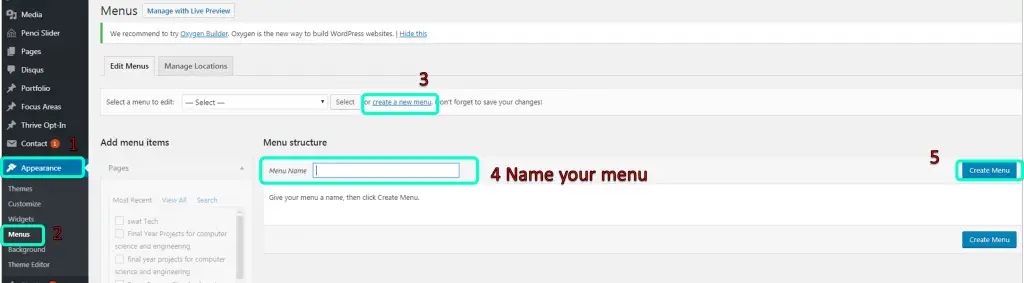
Go to the Menu Screen:
Appearance > Menus > Create new menu > Name your menu > Create menu
Set Your Menu:
Okay, here is where things get a little tricky. Not because its hard, but because every theme is a little different.
Important Note: If you purchased a different theme, it might not look 100% the same as our directions below. Simply read the directions they provide.
In our Themes case, they write “Primary Menu” in English. Meaning it is for the menu on the top. If we select “Footer”, it would be for the Menu on the bottom. Your Theme might be set up differently, play around or read their documentation.
Select > View all > Choose the items you want to add > Add to menu > Select Menu location > Save menu
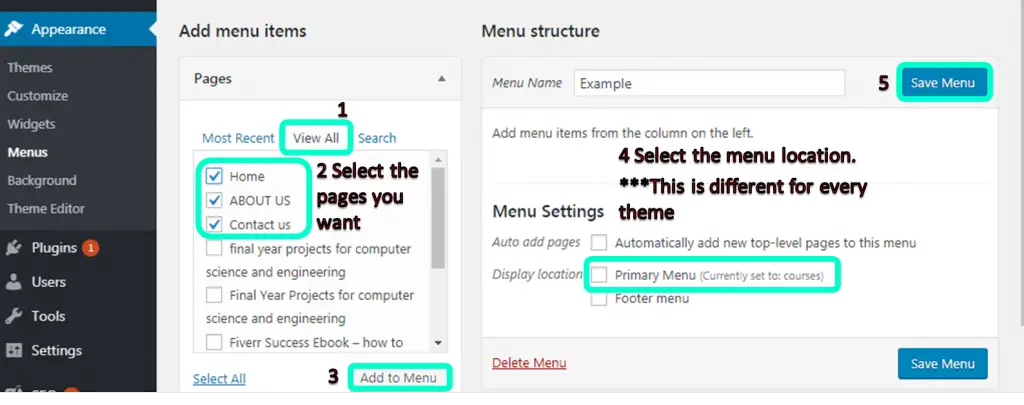
And Boom! We have a Menu On Our Site. Check Your Sites home page!
Change The Favicon Icon & Logo Technology
A logo is one of those strange things people take too seriously. You can always change it at a later date. Get something cheap for now, say $5-$20 USD. Even the cheap ones look nice.
We suggest you find a logo designer on one of these websites:
- Fiverr – (has very cheap logo designers)
- Upwork. Its kind of like a freelancer job board
How To Add A Logo
This is a little different for everyone, depending on your theme. However adding a logo is almost always very similar, you’ll just have to figure out the rest yourself.
Meaning, we can give you a general idea on how to change your logo, however it is a little different for every theme.
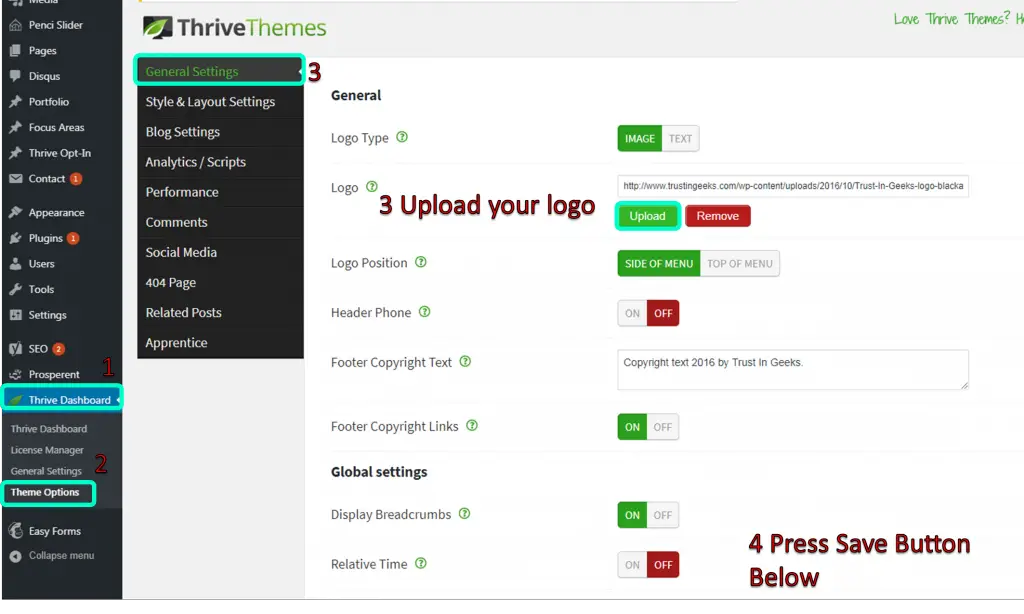
For instance Here is how we did it:
Thrive Dashboard > Theme Options > General Settings > Upload > Save
Change A Widget
Widgets are just the tools that go in your sidebar. For example, if you wanted to an advertisement or something you are promoting, you can put it in your sidebar if you’d like.
Here is an example from the popular travel blog nomadicmatt.com:

All this stuff can be added with Widgets
How To Change / Add Widgets
Select Appearance > Widgets > Then just drag and drop the items you’d like to add to your side bar.
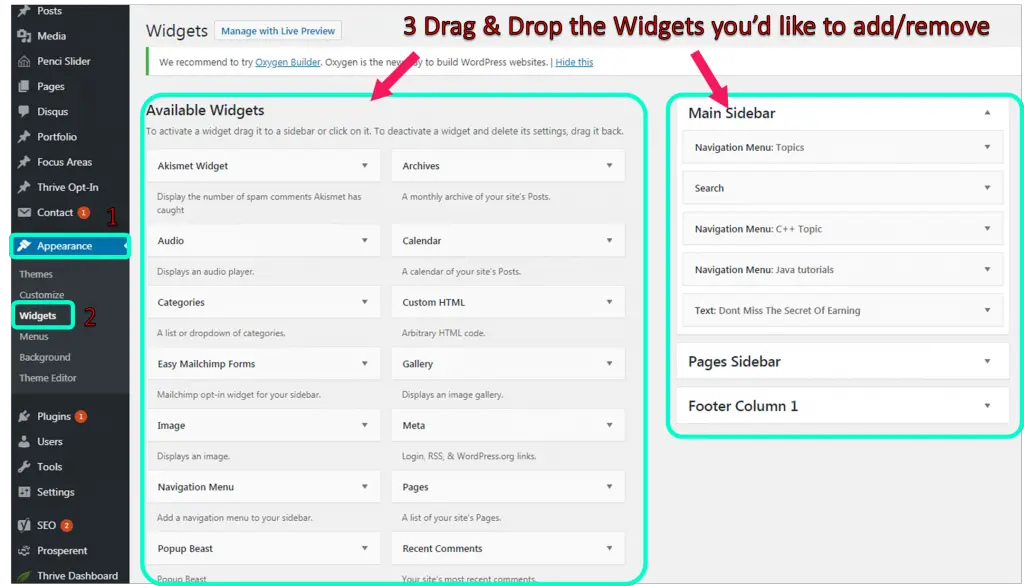
Once you are done, check out one of your pages to see the changes!!
Change Title of Site (Tagline located in Content Management System Area)
Another great tip, which is great for SEO, is to make sure you fill out the areas for your site title and tagline.
This is pretty easy.
Step 1: Settings > General > And fill out this information!
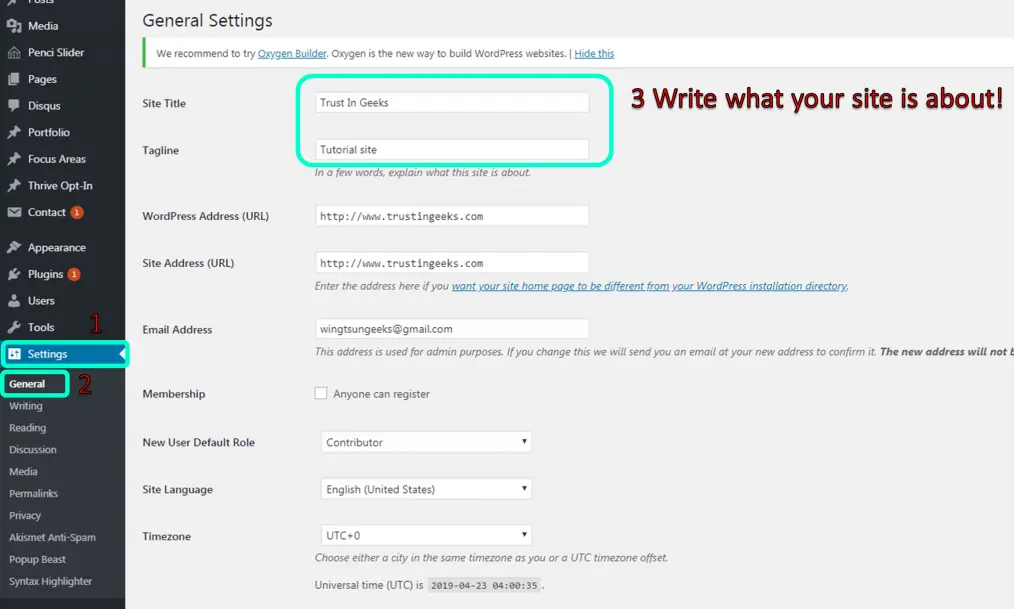
Step 2: Once you are done, don’t forget to save your settings at the bottom of the page!!

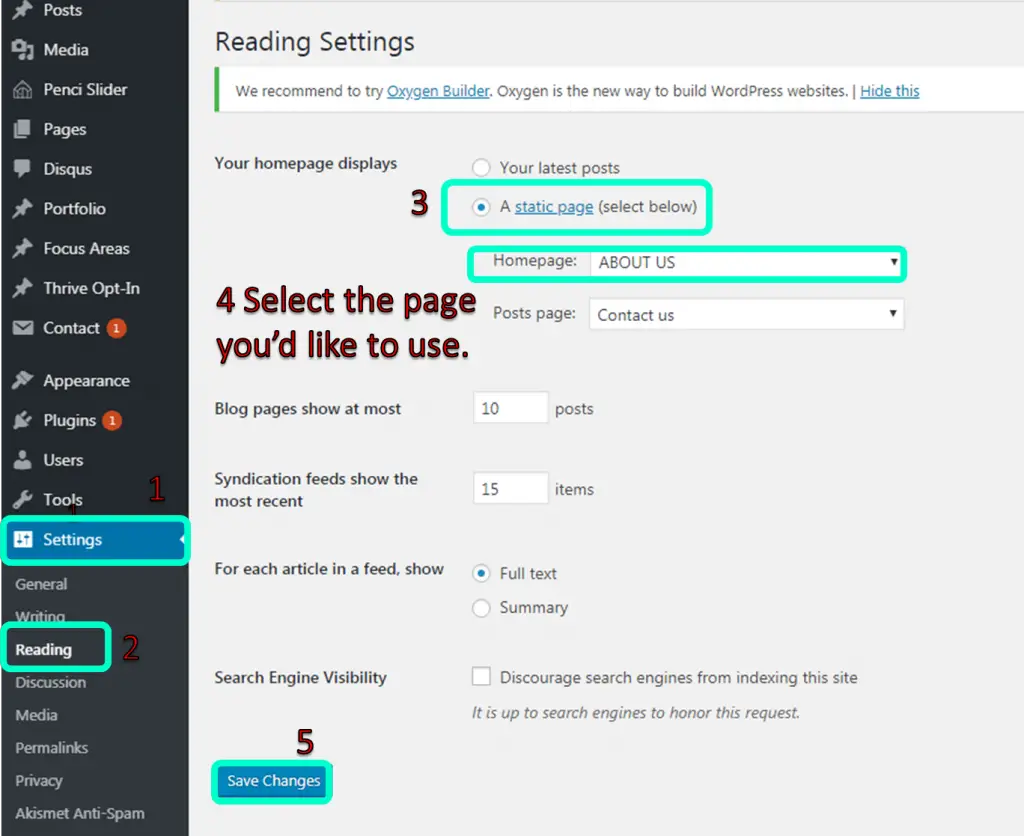
Set Static Home Page
Setting a static home page is a very common practice. For example if you don’t like the theme default home page you can change. It.
Once you’ve created the page you want to set as your homepage, go to:
Settings > Reading > Static Pages > Save Changes
Advanced
WordPress Plugins:
Plugins is what makes WordPress so powerful. If you want to add something, such as a pop up or a newsletter subscription. There’s probably a free or a premium plugin you can buy.
This gives non-techie users the power to do whatever they imagine. There are literally thousands of plugins to choose from.
Plug-in 》Installed plug-in
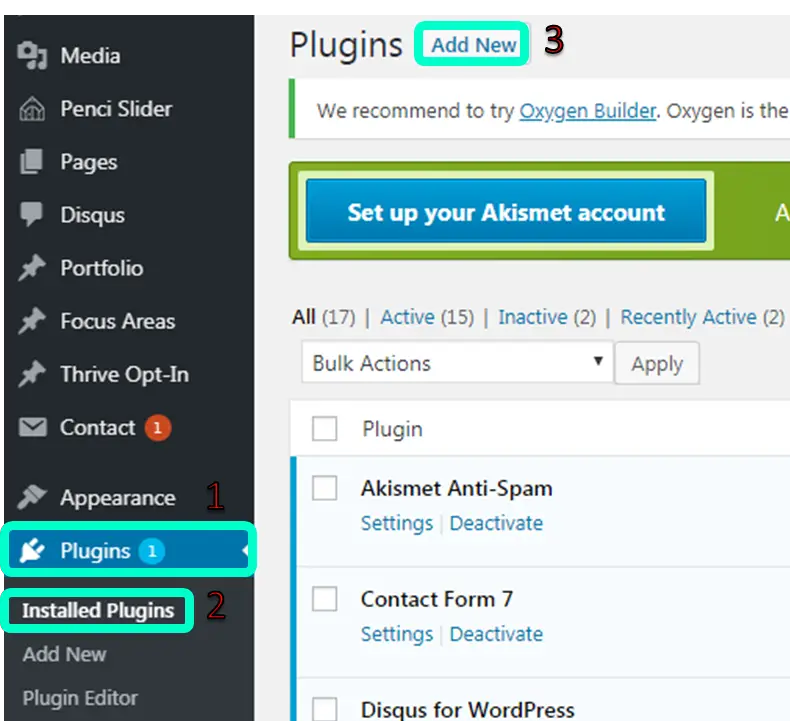
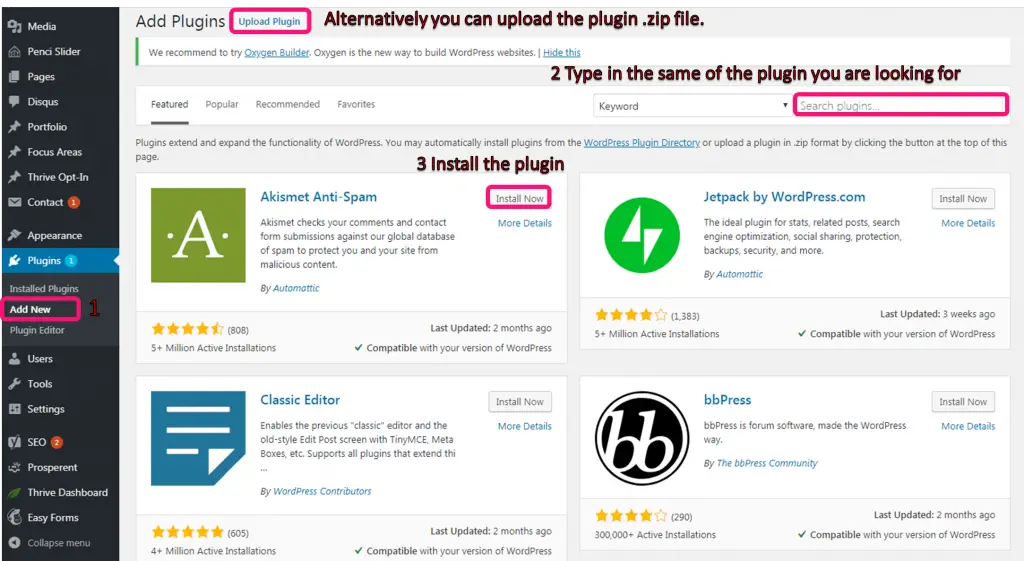
Next, type in the name of the plugin you want to find and install it. Alternatively you can upload the plugin .zip file.
Important Note: For paid or premium plugins, you’d have to upload the zip file to your site. For obvious reasons, they are not available in the WordPress free repository.
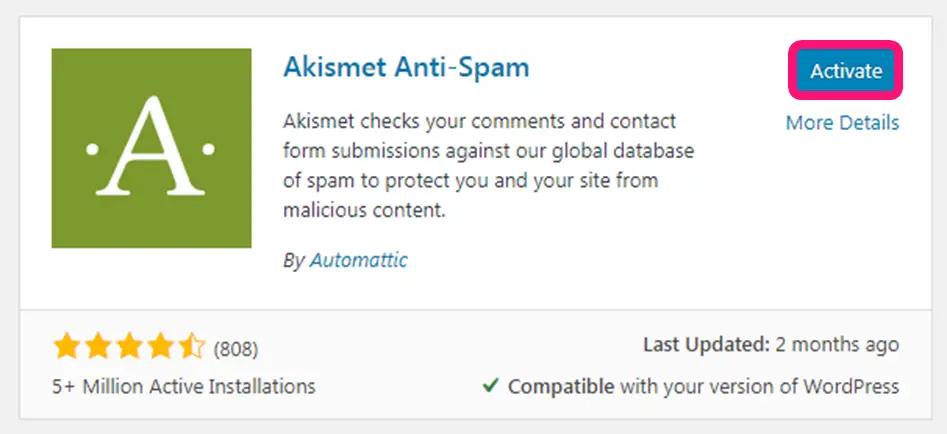
Finally, active the plugin:
My Recommended Free and Open Source Plugins:
- Contact Form 7 – Makes it Easy For People To Contact you.
- Akismet Anti-Spam – Prevents Spam comments
- AMP – More on this later ;-)
- Glue for Yoast SEO & AMP
- Wordfence Security — Great security plugin, however if it blocks pages you want to use, you have to ‘whitelist’ them.
- Limit Login Attempts Reloaded – Another security plugin to limit the amount of times someone can try to login.
- WP Super Cache – Caching plugin, makes your website load faster.
- Really Simple SSL – Only if your site is currently on SSL.
I suggest you install all the plugins I have listed above 😀
WordPress Security Technology:
This is the advice I wish someone gave me when I first started to use WordPress. Nowadays, it’s pretty easy to hack into websites. Taking the following steps, while we can’t guarantee hackers won’t get in, it will make it a lot harder for them.
Step 1: Have a complex password for your WordPress install and hosting. Don’t be lazy 😀
Step 2: Regularly update WordPress, themes and plugins.
This is the majority of the time, this is how the bag guys get in. They take advantage of frees themes & plugins, especially the popular ones. Which is why we always advise against free themes, they often get hacked into.
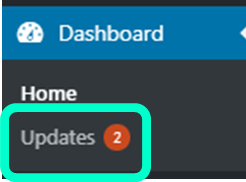
Whenever you log into your website, you’ll see how many items need to be notified of all updates required.
Step 3: Install The firewall plugin 「Wordfence」 and 「Limit Login Attempts Reloaded.」 We have this in our plugins section.
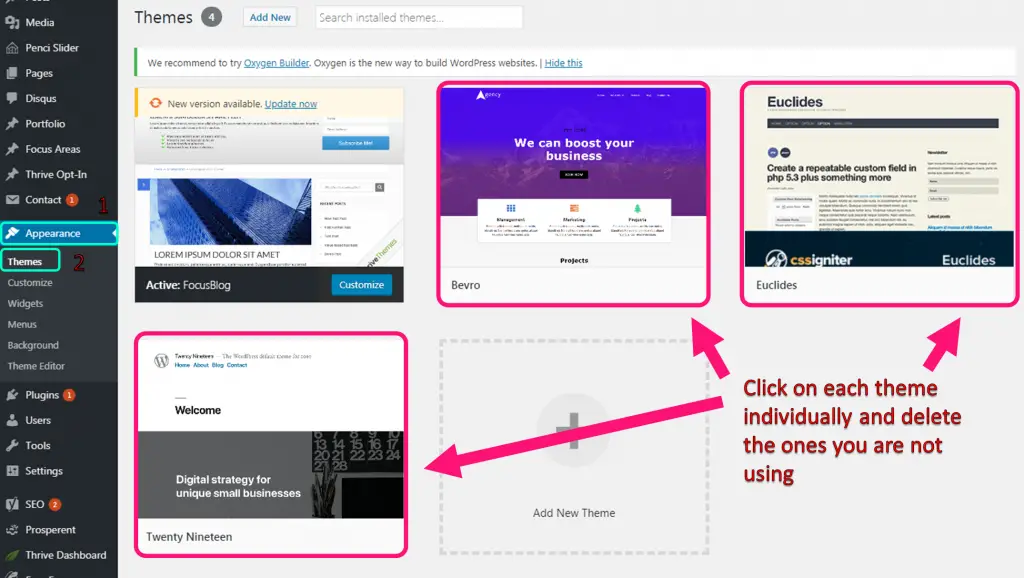
Step 4: Delete All Themes you are not using.
Even if a theme is not active, they can still get hacked into. Or worse, they can hack in a different way and hide malicious scripts in themes you are not using, making them harder to find and clean up.
Go to: Appearance > Set theme > Then select the them you want to delete.
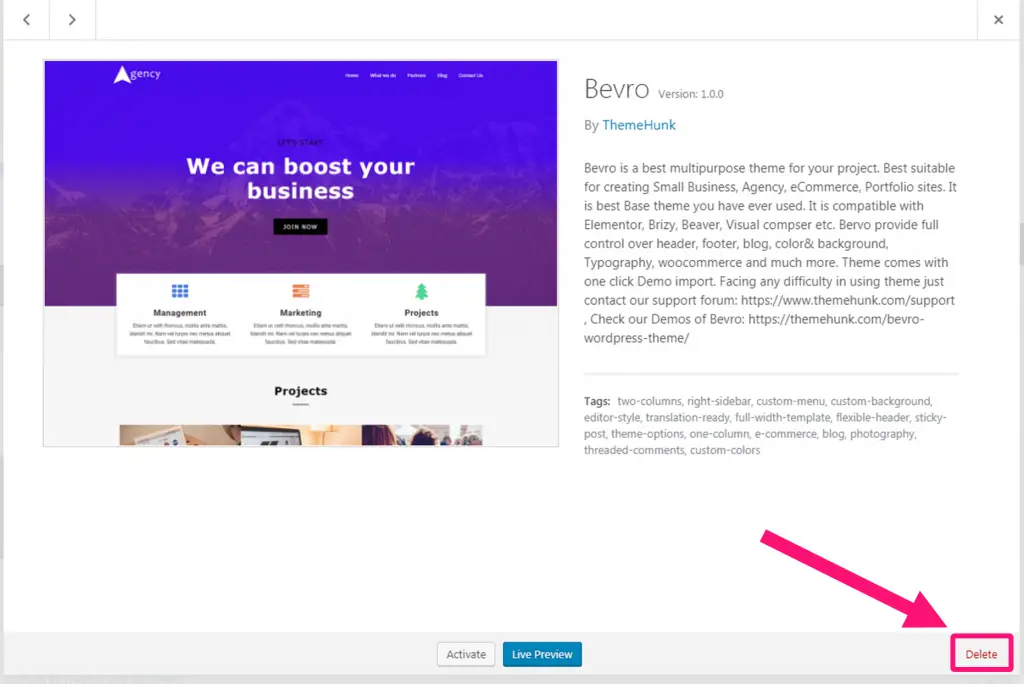
After you have clicked on the theme, press “Delete”
Do this for each one of the themes you are not using.
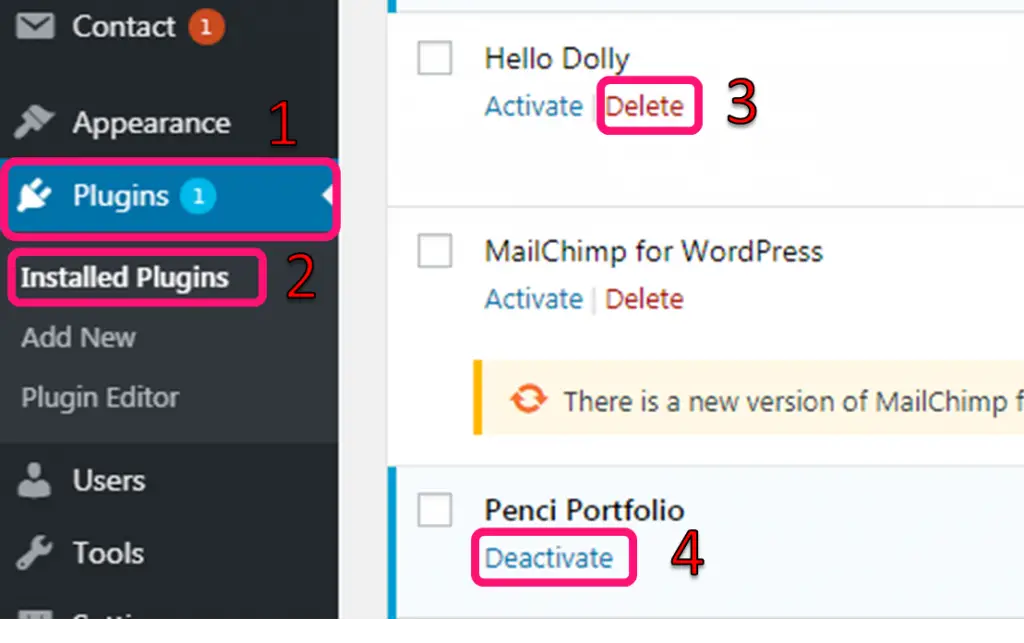
Step 5: Delete all WordPress Plugins you are not using or was installed by your hosting
For example “Hello Dolly” is a plugin that doesn’t really do anything. Remove it, don’t allow hackers the opportunity to get into your site.
Note: Some of them might be currently active, you’ll have to deactivate it before you can delete it.
Want to read this guide in a different language?
This guide has become so popular that it has been translated into different languages!! If you’d like to read it in Chinese, you can check out the article WordPress新手教學:一個完全免費的課程(安裝+購物車 + 主題外掛 from the site called I Know Wang, from what we understand, our guide was so indept it took them almost 2 weeks to translate!!