Description: in this tutorials we will learn how to connect android app to mysql database with example.
I have spend much to accomplish this task, so then i thought why not to write an article on this so that others may also get help.Lets begin the tutorial with what we will need for this :
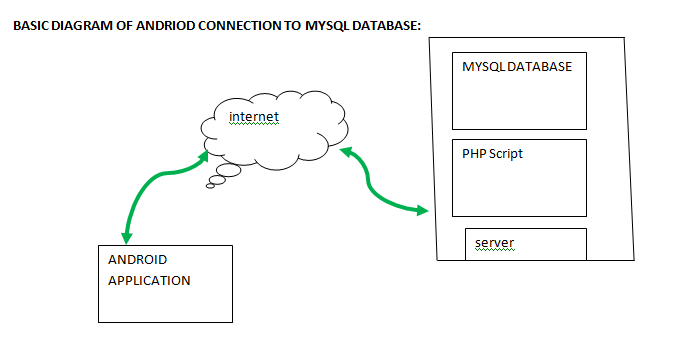
What we will need to connect Mysql database to an android app:
- First of all you should have a an online server where you can make your database.
- You can also use local host for this purpose
- Php Script that will run on server and fetch the data from MySql database
- And last but not least you will have an android app to display data from Mysql database after making proper connection.
Online server:
For this you can use one of the free hosting that 000web.com will provide you.Make a free account there and then go to the cpanel and make a database in PHP Myadmin area.
Or you can simpley install a XAMPP package for working on local host.
For now you just make a simple database for login that contain
You can check out our latest article on how to fetch data from web service populate list view with source code.
ID
Username
We will make a simple application on android that will fetch id and username form the remote server that is Mysql database.
PHP Script :
Now upload the php script that is given below with name of Myfile.php with help of file manager to you html_public folder .
What this php script will do, it will fetch the data from the Mysql database and give it as an output the android app in the form of Jason formate. Which we will then display on the screen of our application with help of simple text view.
Listing#1 Myfile.php
<?php

mysql_connect("mysql.webhost.com","a5224389_el","HamDard");//change server name  //pass username according your settings

mysql_select_db("a5224389_eft");// also chang the Mysql database name

$sql1=mysql_query("select * from login ");

if (!$sql1) {

echo "Could not successfully run query ($sql) from DB: " . mysql_error();

exit;

}

while($row=mysql_fetch_assoc($sql1))

$output[]=$row;


print(json_encode($output));// this will print the output in json

mysql_close();

?>
If you are using localhost then place the localhost inplace of server name .
Andoid App conection to the remote server:
Make a new project with any name , and drag simple text view to display the data from remote Mysql database on the android app.

Listing#2 Main_activity.xml
xmlns:tools="http://schemas.android.com/tools"

android:layout_width="match_parent"

android:layout_height="match_parent"

android:paddingBottom="@dimen/activity_vertical_margin"

android:paddingLeft="@dimen/activity_horizontal_margin"

android:paddingRight="@dimen/activity_horizontal_margin"

android:paddingTop="@dimen/activity_vertical_margin"

tools:context=".MainActivity" >

<TextView

android:id="@+id/result"

android:layout_width="match_parent"

android:layout_height="wrap_content"

android:layout_alignParentTop="true"

android:layout_centerHorizontal="true"

android:layout_marginTop="42dp"

android:text="TextView" />
Android Manifiest file:
Make only one change in the manifiest file that is user permission for the internet.
Listing#3 Manifiest.xml
package="com.lasttry"

android:versionCode="1"

android:versionName="1.0">

<uses-sdk

android:minSdkVersion="9"

android:targetSdkVersion="18" />


<application

android:allowBackup="true"

android:icon="@drawable/ic_launcher"

android:label="@string/app_name"

android:theme="@style/AppTheme" >

<activity

android:name="com.lasttry.MainActivity"

android:label="@string/app_name" >

<intent-filter>
Listing#4 MainActivit.java
import java.io.BufferedReader;

import java.io.InputStream;

import java.io.InputStreamReader;

import org.apache.http.HttpEntity;

import org.apache.http.HttpResponse;

import org.apache.http.client.HttpClient;

import org.apache.http.client.methods.HttpPost;

import org.apache.http.impl.client.DefaultHttpClient;

import org.json.JSONArray;

import org.json.JSONObject;

import android.app.Activity;

import android.os.Bundle;

import android.os.StrictMode;

import android.util.Log;

import android.widget.TextView;


public class MainActivity extends Activity {

/** Called when the activity is first created. */

TextView resultView;

@Override

public void onCreate(Bundle savedInstanceState) {

super.onCreate(savedInstanceState);

setContentView(R.layout.activity_main);

StrictMode.enableDefaults(); //STRICT MODE ENABLED

resultView = (TextView) findViewById(R.id.result);

getData();

}

public void getData(){

String result = "";

InputStream isr = null;

try{

HttpClient httpclient = new DefaultHttpClient();

HttpPost httppost = new HttpPost("http://ieeehiit.host22.com/myfile.php"); //YOUR PHP SCRIPT ADDRESS

// HttpPost httppost = new HttpPost("http://172.23.193.32/elift-test/myfile.php"); //YOUR PHP SCRIPT ADDRESS

HttpResponse response = httpclient.execute(httppost);

HttpEntity entity = response.getEntity();

isr = entity.getContent();

}

catch(Exception e){

Log.e("log_tag", "Error in http connection "+e.toString());

resultView.setText("Couldnt connect to database");

}

//convert response to string

try{

BufferedReader reader = new BufferedReader(new InputStreamReader(isr,"iso-8859-1"),8);

StringBuilder sb = new StringBuilder();

String line = null;

while ((line = reader.readLine()) != null) {

sb.append(line + "\n");

}

isr.close();

result=sb.toString();

}

catch(Exception e){

Log.e("log_tag", "Error  converting result "+e.toString());

}

//parse json data

try {

String s = "";

JSONArray jArray = new JSONArray(result);

for(int i=0; i<jArray.length();i++){

JSONObject json = jArray.getJSONObject(i);

s = s +"Name : "+json.getString("id")+" "+json.getString("username");  }

resultView.setText(s);

} catch (Exception e) {

// TODO: handle exception

Log.e("log_tag", "Error Parsing Data "+e.toString());

}

}

}
Note:
if you are using Local host for your application, first find the IP address of your localhost, for this simply time ipconfigall in your command prompt. You will get the ip address of your localhost server.If still you are getting errors and can not connect your mysql database to the android app then you can ask in the comments, i am myself a student but will help as i can , or will ask some other expert.
you can also learn about how to remove title bar and status bar from android application
Note the above code run in older version of android for the latest versions it has been made maindatery to use Aysctask to carry out long running operation such as conecting to servers, sending and reciving of data . The above code is rewritten to make it competitable with all versions ! please leave your response if you have any issues
Listing#5 connect android app to mysql database with AsycTask class MainActivit.java
import java.io.BufferedReader;

import java.io.InputStream;

import java.io.InputStreamReader;

import org.apache.http.HttpEntity;

import org.apache.http.HttpResponse;

import org.apache.http.client.HttpClient;

import org.apache.http.client.methods.HttpPost;

import org.apache.http.impl.client.DefaultHttpClient;

import org.json.JSONArray;

import org.json.JSONObject;

import android.app.Activity;

import android.os.Bundle;

import android.os.StrictMode;

import android.util.Log;

import android.widget.TextView;


public class MainActivity extends Activity {

/** Called when the activity is first created. */

TextView resultView;

@Override

public void onCreate(Bundle savedInstanceState) {

super.onCreate(savedInstanceState);

setContentView(R.layout.activity_main);

resultView = (TextView) findViewById(R.id.result);

new MyAsyncTask().execute("").get();

}

class MyAsyncTask extends AsyncTask<String, Integer, String>{

public MyAsyncTask() {
// TODO Auto-generated constructor stub
}

@Override
protected String doInBackground(String... params) {
pb.setVisibility(View.GONE);

String result = "";

InputStream isr = null;

try{

HttpClient httpclient = new DefaultHttpClient();

HttpPost httppost = new HttpPost("http://ieeehiit.host22.com/myfile.php"); //YOUR PHP SCRIPT ADDRESS

// HttpPost httppost = new HttpPost("http://172.23.193.32/elift-test/myfile.php"); //YOUR PHP SCRIPT ADDRESS

HttpResponse response = httpclient.execute(httppost);

HttpEntity entity = response.getEntity();

isr = entity.getContent();

}

catch(Exception e){

Log.e("log_tag", "Error in http connection "+e.toString());

resultView.setText("Couldnt connect to database");

}

//convert response to string

try{

BufferedReader reader = new BufferedReader(new InputStreamReader(isr,"iso-8859-1"),8);

StringBuilder sb = new StringBuilder();

String line = null;

while ((line = reader.readLine()) != null) {

sb.append(line + "\n");

}

isr.close();

result=sb.toString();

}

catch(Exception e){

Log.e("log_tag", "Error  converting result "+e.toString());

}

return result;

}
protected void onPostExecute(Double result){

//parse json data

try {

String s = "";

JSONArray jArray = new JSONArray(result);

for(int i=0; i<jArray.length();i++){

JSONObject json = jArray.getJSONObject(i);

s = s +"Name : "+json.getString("id")+" "+json.getString("username");  }

resultView.setText(s);

} catch (Exception e) {

// TODO: handle exception

Log.e("log_tag", "Error Parsing Data "+e.toString());

}

}
}


This is an outdated tutorial.. All the classes used here are deprecated now.. Check the fully updated tutorial I have written here
http://www.simplifiedcoding.net/android-mysql-tutorial-to-perform-basic-crud-operation/
Hi, I am missing the classes “pb”, “httpClient”, “DefaultHttpClient”, “HttpPost”, “getEntity”, “getContent” and “HttpResponse”; where can I get them?
I have same problem here ,
When i run it always say “could not connect to the database” please help me thanks in advance .
Its not working for me it always say “Could not connect to the database”
And what this code means pb.setVisibility(View.GONE);
Please Help…I am waiting
Its not working for me it always say “Could not connect to the database”
And what this code means pb.setVisibility(View.GONE);
Please Help
Haven’t found yet? I am stuck on the same issue
Check out this tutorial
http://www.simplifiedcoding.net/android-mysql-tutorial-to-perform-basic-crud-operation/
I was on it since 20 minutes, by coincidence!
hahah thats great so it worked for you or not??
I am now trying it differently, as I’d simple need to retrieve data. I guess setting the tags, obtaining a string and parsing (as well as setting the TextView) should be enough, correct?
Mate, it doesn’t work, unfortunately. What is your e-mail address, please?
It works buddy i posted the video of my app as well you can see its working
My email is
[email protected]
Thankyou very very very much bro…..i searched and tried almost all codes in google but i dont know why no code helped i mean connected to server
and atlast found this post………thank you god and thank you bro
love u
thanks for your appreciation
Good Job man. Thanks…
well in android long processing should not be done on the main thread! that was best practice!, but since honey Cm version it has become a law , this mean you must run long running task, such connectivity to internet , file downloading etc, must run on seperate thread! so the problem with your app may due to this problem! i will soon write another article on that !
thanks for being here!
when i enable strictmode it gives an error and option “Add @suppresslint new api to main activity”, still not working