[compare q=”Android course” gtm=”on” ct=”US” v=”grid” id=”eb78e3c6383a1dfa1c991d3325e5429b,8c40bdcb154068dca07598583f0ef25f,” ft=”fetchProducts” w=”auto”][/compare]
How to connect Android app to MySQL database:
Description: In this article we will learn how to connect android application to MySql database and apply the few of the queries (CREATE, READ ,UPDATE,DELETE) also called CRUD with proper code and explanation.
Introduction: Many android application on Google play store uses online Database to retrieve data, to be shown to the user. This is done, due to fact that we can’t store large amount of data on our android mobile. Some android application uses sqlite database for some of android application, but the data has to be of limited size.
Many android application make use online database to have data of their users. Although we can use different web services for our application, depending on the needs of application we are to built.
Suppose if we need to make weather application, we will simply use any web service that provide us the data of the weather , which we can display on our appplication. But sometimes it becomes mandatory to make your online database.
Lets know break down the tutorial into some steps .
- How to Make a free database, domain name and hosting at 00webhost.com
- Php script of CRUD sql queries.
- Android application user interface.
- Android application main java file.
- Android application manifest file.
- Conclusion
How to make free database, domain name and hosting at 00webhost.com?
First of all we need to make a free account at 00webhost website. Register a free domain .Once you register your free domain, navigate cpanel. Next step is to create a simple database at Phpmyadmin area.
Create a database with any name.
For this tutorial we would like to make an application for displaying list of products. The products will be the different types of mobiles phones .
Database should contain the following fields:
- ID int (11) primary key auto incremented
- mobileName varchar(255)
- mobileModel varchar (255)
- mobilePrice int(11)
Once the database with above description is created, we are ready for the next step.
NOTE: Note down the name of the database, server, username, and password , we will require this data make a connection to the database.
Php script for CRUD sql queries.
In your cpanel browse to filemanger , then to public-html and create an new file with name of “queries.php”.
You will need to write the php script that should respond to event that we trigger on our android application.
Note : Your specification to make connection to the database.
$hostname = “mysql8.000webhost.com”;
$username =”a522438_elift”;
$password =”Hamdard12″;
$db = “a522438_elift”;
Now lets first make a connection to the database and display that on our android device.
Listing#1 Product.php
<?php

$hostname = "mysql8.000webhost.com";

$username ="a5224389_elift";

$password ="Hamdard12";

$db = "a5224389_elift";

$conn = new mysqli($hostname,$username,$password,$db);

if($conn->connect_error){

$response[‘success’] =0;

$response[‘message’] =”could not connect to the database”;

print(json_encode($response));

die(print(json_encode($response)));

}

$response[success] =1;

$response[message] =”successfully connected to the database”;

print(json_encode($response));

?>
Explanation code:
In the first step we make a simple connection to the database. To notify the user we send the $response value to android applcation, that is for value 1 , we will display the database is connected successfully , where as for the value 0 we will display the text saying that database could not be connected .
Now lets look at the java code and xml representation, we have used to get all this functionality .
Listing#2 MainActivity.java
package com.conndb;

import java.io.BufferedReader;

import java.io.IOException;

import java.io.InputStream;

import java.io.InputStreamReader;

import java.io.UnsupportedEncodingException;

import java.util.ArrayList;

import java.util.List;

import org.apache.http.HttpEntity;
import org.apache.http.HttpResponse;
import org.apache.http.NameValuePair;
import org.apache.http.client.ClientProtocolException;
import org.apache.http.client.entity.UrlEncodedFormEntity;
import org.apache.http.client.methods.HttpGet;
import org.apache.http.client.methods.HttpPost;
import org.apache.http.client.utils.URLEncodedUtils;
import org.apache.http.impl.client.DefaultHttpClient;
import org.apache.http.message.BasicNameValuePair;
import org.json.JSONException;
import org.json.JSONObject;
import android.os.AsyncTask;
import android.os.Bundle;
import android.app.Activity;
import android.app.ProgressDialog;
import android.content.Intent;
import android.util.Log;
import android.view.Menu;
import android.view.View;
import android.view.View.OnClickListener;
import android.widget.Button;
import android.widget.TextView;
import android.widget.Toast;

public class MainActivity extends Activity {
private static final String TAG_SUCCESS = "success";
private static final String TAG_MESSAGE = "message";

TextView tv;

String textview = null;
static JSONObject jObj ;
static String json = "";

@Override
protected void onCreate(Bundle savedInstanceState) {
super.onCreate(savedInstanceState);
setContentView(R.layout.activity_main);
tv = (TextView) findViewById(R.id.textView1);
Button b2 = (Button) findViewById(R.id.button2);
b2.setOnClickListener(new OnClickListener() {

@Override
public void onClick(View v) {
// TODO Auto-generated method stub
Intent i2 = new Intent(MainActivity.this,menuList.class);
startActivity(i2);
}

});

Button connectdb = (Button) findViewById(R.id.button1);
connectdb.setOnClickListener(new OnClickListener() {
@Override
public void onClick(View v) {
// TODO Auto-generated method stub
new Connectingdb().execute();
}

});

}

class Connectingdb extends AsyncTask<String, String, JSONObject> {
/*Before starting background thread Show Progress Dialog

* */

boolean failure = false;
private ProgressDialog pDialog;
@Override
protected void onPreExecute() {
super.onPreExecute();
pDialog = new ProgressDialog(MainActivity.this);
pDialog.setMessage("Attempting connect...");
pDialog.setIndeterminate(false);
pDialog.setCancelable(true);
pDialog.show();
}

@Override
protected JSONObject doInBackground(String... args) {
InputStream is = null;
// Making HTTP request
try {
// check for request method
{
// request method is POST
// defaultHttpClient

DefaultHttpClient httpClient = new DefaultHttpClient();
HttpPost httpPost=new HttpPost("http://ieeehiit.host22.com/product.php");
HttpResponse httpResponse = httpClient.execute(httpPost);
HttpEntity httpEntity = httpResponse.getEntity();
is = httpEntity.getContent();}

}

catch (UnsupportedEncodingException e) {
e.printStackTrace();
} catch (ClientProtocolException e) {
e.printStackTrace();
} catch (IOException e) {
e.printStackTrace();
}

try {
BufferedReader reader = new BufferedReader(new InputStreamReader(
is, "iso-8859-1"), 8);
StringBuilder sb = new StringBuilder();
String line = null;
while ((line = reader.readLine()) != null) {
sb.append(line + "\n");
}
json = sb.toString();
jObj = new JSONObject(json);
is.close();
return jObj;
}
catch (Exception e) {
Log.e("Buffer Error", "Error converting result " + e.toString());
return null;
}
}

/**

* After completing background task Dismiss the progress  dialog

* **/

protected void onPostExecute(JSONObject json) {
int success = 0;
try {
success = json.getInt(TAG_SUCCESS);
} catch (JSONException e) {
// TODO Auto-generated catch block
e.printStackTrace();
}

if (success == 1)

try {

display(json.getString(TAG_MESSAGE));

} catch (JSONException e) {

// TODO Auto-generated catch block

e.printStackTrace();

}

pDialog.dismiss();

}

}

public void display(String m){

tv.setText(m);

}

}
Explaination to code:
Before we jump into explaining the code, lets first have some basic concepts of how do we perform long running operation in android .
Each application in android runs on its main thread. Main activity containing, most of the user interface widgets needs runs on the main thread.In case we want to perform operations that require few seconds(such as connectivity to online server, login in and other similar works ) will freeze the main activity thus user would not be able to interact with application.
To get rid of this problem android has a special class called AsynTask, that is special built form these kind of operation. As you can see in the code above we have used the AsyncTask.
AsynTask has one method that must be overridden that is
@Override
protected< String doInBackground(String… args) {}
Which take arguments that is multiple arguments, which are stored as an array of type String(you are not restricted to only strings).The above signature is used when you need to use same type of data types for your AsyncTask.
AsyncTask<String, String, String>
Note that while we are doInBackground() method, we cannot, touch the views. Inother words you cannot, assign values to textviews etc.
So how to notify the user , that something is happening in the background we make use of two methods
protected void onPreExecute()
It will be executed before the doInBackground method gets started.
protected void onPostExecute()
It will be executed after the doInBackground method. And it takes the argument, from the doInBackground method that can be stored in any view, such as textview as we have shown in the code.
You may also have noticed that we have also used the progress bar that starts onPreExecutes and gets hidden in the method named onPostExecte.
This is to make the user notified, and ask to wait for few seconds as our background task is going on.
Now let’s get back to code and explain what actually is happening!
To make a request to the user , we can either use , the HTTP request or we can use the HTTP URL connection.
The above code uses HTTP method, where as most of the application, now a days uses URL connection method, which is continually maintained by the android developing team. The former method has not been maintain for quite some time.
We simple use Request and response objects to make a connection to the server in the above code.
DefaultHttpClient httpClient = new DefaultHttpClient();

HttpPost httpPost = new  HttpPost("http://ieeehiit.host22.com/product.php");

HttpResponse httpResponse = httpClient.execute(httpPost);

HttpEntity httpEntity = httpResponse.getEntity();

is = httpEntity.getContent();
httpPost object behaves as a request with a http methode of type post, URL as an argument.
Response is then stored in InputStrem object “is” using httpEnity.getContent().
We simply then read line by line, the input stream, and deal with it, they way we want to deal, with it.
In our case we simply have either 1 or 0 as a response from the server, and once we know the response value we notify the user on the basis of that value.
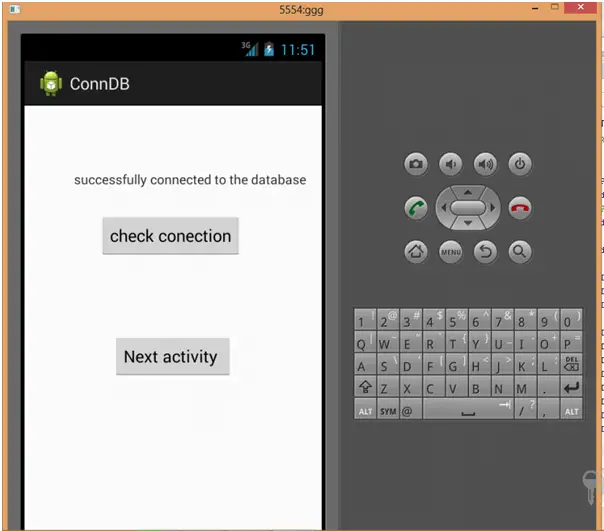
In this version of our application we simply have a button view and text view. When clicked on button, we are shown with result weather connected or not! Besides this we have used RelativeLayout for our xml representation, which positions the items in a respective manner
Listing#3 activity_main.xml
<RelativeLayout xmlns:android="http://schemas.android.com/apk/res/android"

xmlns:tools="http://schemas.android.com/tools"

android:layout_width="match_parent"

android:layout_height="match_parent"

android:paddingBottom="@dimen/activity_vertical_margin"

android:paddingLeft="@dimen/activity_horizontal_margin"

android:paddingRight="@dimen/activity_horizontal_margin"

android:paddingTop="@dimen/activity_vertical_margin"

tools:context=".MainActivity" >


<Button

android:id="@+id/button1"

android:layout_width="wrap_content"

android:layout_height="wrap_content"

android:layout_alignParentLeft="true"

android:layout_alignParentTop="true"

android:layout_marginLeft="64dp"

android:layout_marginTop="100dp"

android:text="check conection" />


<TextView

android:id = "@+id/textView1"

android:layout_width = "match_parent"

android:layout_height = "wrap_content"

android:layout_alignParentTop = "true"

android:layout_centerHorizontal = "true"

android:layout_marginTop ="53dp"

android:text="TextView" />

</RelativeLayout>
OUTPUT:
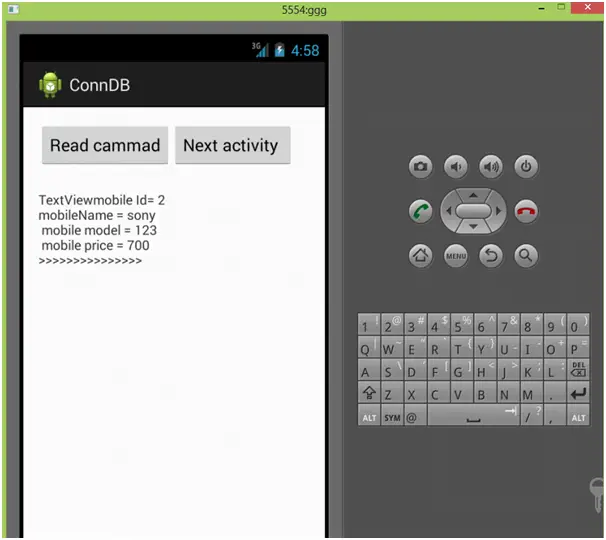
Now we will modify both our php Script and UI interface so that we apply the read sql query to fetch data from the database and display it on the android application.
Implementing Read query on Mysql database using android:
Lets first look at the modification that we have to make in order to implement read query.
Listing #4 Php Script Version2:
<?php

$hostname = "mysql8.000webhost.com";

$username ="a5224389_elift";

$password ="Hamdard123";

$db = "a5224389_elift";

$conn = new mysqli($hostname,$username,$password,$db);

if($conn->connect_error){

$response ="could not connect to the database";

die(print(json_encode($response)));}

$q ="Select * from product";

$result = $conn->query($q);

while($row = $result->fetch_assoc()){

$output= $row;

}

print(json_encode($output));

$conn->close();


?>
Explanation to the code:
The data displayed on the screen of android application is fetched as json(which is a data format same like XML but is light weight ). Json data can of two types , Json Objects and json Arrays .
To display the json on android screen you will first need to parse the data, for which you will need to first analyse whether your data is coming as json objects or json Arrays .
[ ] brackets are signs of json objects where as {} brackets are the signs of objects.
Coming back to the code of Php script, we have simply used the select query, and then printed the data as json.
$q =”Select * from product”;
$result = $conn->query($q);
while($row = $result->fetch_assoc()){
$output= $row;}
print(json_encode($output));
Now lets look at the changes that we have made in our mainActivity.java file in order to display this data.
Listing #5 mainActivity java version 2
public class MainActivity extends Activity {
TextView tv;
String textview = null;
static JSONObject jObj ;
static String json = "";

@Override
protected void onCreate(Bundle savedInstanceState) {
super.onCreate(savedInstanceState);
setContentView(R.layout.activity_main);
tv = (TextView) findViewById(R.id.textView1);
Button b2 = (Button) findViewById(R.id.button1);

b2.setOnClickListener(new OnClickListener() {

@Override
public void onClick(View v) {

// TODO Auto-generated method stub

Intent i2 = new Intent(MainActivity.this,menuList.class);
startActivity(i2);

}

});
Button connectdb = (Button) findViewById(R.id.button1);
connectdb.setOnClickListener(new OnClickListener() {

@Override
public void onClick(View v) {
// TODO Auto-generated method stub
new Connectingdb().execute();
}

});
}

class Connectingdb extends AsyncTask<String, String, JSONObject> {
/**

* Before starting background thread Show Progress Dialog

* */

boolean failure = false;
private ProgressDialog pDialog;

@Override
protected void onPreExecute() {
super.onPreExecute();
pDialog = new ProgressDialog(MainActivity.this);
pDialog.setMessage("Attempting connect...");
pDialog.setIndeterminate(false);
pDialog.setCancelable(true);
pDialog.show();

}
@Override
protected JSONObject doInBackground(String... args) {
InputStream is = null;

// Making HTTP request

try {
// check for request method

{

// request method is POST

// defaultHttpClient
DefaultHttpClient httpClient = new DefaultHttpClient();
HttpPost httpPost = new HttpPost("http://ieeehiit.host22.com/product.php");
HttpResponse httpResponse =             httpClient.execute(httpPost);
HttpEntity httpEntity = httpResponse.getEntity();
is = httpEntity.getContent();

}
} catch (UnsupportedEncodingException e) {

e.printStackTrace();

} catch (ClientProtocolException e) {

e.printStackTrace();

} catch (IOException e) {

e.printStackTrace();

}

try {

BufferedReader reader = new BufferedReader(new InputStreamReader(

is, "iso-8859-1"), 8);

StringBuilder sb = new StringBuilder();

String line = null;

while ((line = reader.readLine()) != null) {

sb.append(line + "\n");

}

json = sb.toString();
jObj = new JSONObject(json);
is.close();
return jObj;
} catch (Exception e) {

Log.e("Buffer Error", "Error converting result " + e.toString());
return null;

}
}

/**

* After completing background task Dismiss the progress dialog

* **/

protected void onPostExecute(JSONObject json) {

try {
int mobid = json.getInt("ID");
String mobilename = json.getString("mobileName");
String mobileModel = json.getString("mobileModel");
int mobilePrice = json.getInt("mobileprice");

display("mobile Id= "+mobid+"\nmobileName = "+mobilename +"\n mobile model = "+mobileModel +"\n mobile price = "+mobilePrice+"\n>>>>>>>>>>>>>>>\n");

} catch (JSONException e) {

// TODO Auto-generated catch block

e.printStackTrace();

}
pDialog.dismiss();
}
}
public void display(String m){
tv.setText(m);
}
}
Explanation to the code:
Most the code above is similar to our previous code, whe just made some changes.
To get the exact data , we are looking for
static JSONObject jObj ;
is being used.
Remeber that, since we have used , our own php script, the data is in json, objects we are only showing one recode right now on our android application. This is just to make you familiar with usage. Most often while dealing with web-services you will be having your data as jsonArray , That is more efficient , you can play around with data as you want. I could have use some libraries to show all of the recodes on screen.
int mobid = json.getInt("ID");
String mobilename = json.getString("mobileName");
String mobileModel = json.getString("mobileModel");
int mobilePrice = json.getInt("mobileprice");
display("mobile Id= "+mobid+"\nmobileName = "+mobilename +"\n mobile model = "+mobileModel +"\n mobile price = "+mobilePrice+"\n>>>>>>>>>>>>>>>\n");
[code]
After Passing the JSONObject from the doInBackground method, the data is stored in relative string, using get methods of the jsonclass.which is then passed to display method to be appended to the textView.
We do have made some of the changes in the XML file also.
<h2>Listing #6 activity_main.xml</h2>
[code language="java]
<RelativeLayout xmlns:android="http://schemas.android.com/apk/res/android"
xmlns:tools="http://schemas.android.com/tools"
android:layout_width="match_parent"
android:layout_height="match_parent"
android:paddingBottom="@dimen/activity_vertical_margin"
android:paddingLeft="@dimen/activity_horizontal_margin"
android:paddingRight="@dimen/activity_horizontal_margin"
android:paddingTop="@dimen/activity_vertical_margin"
tools:context=".MainActivity" >
<ScrollView
android:id="@+id/scrollView1"
android:layout_width="wrap_content"
android:layout_height="wrap_content"
android:layout_marginLeft="37dp" >
<LinearLayout
android:layout_width="match_parent"
android:layout_height="match_parent"
android:orientation="vertical" >
</LinearLayout>
</ScrollView>
<TextView
android:id="@+id/textView1"
android:layout_width="wrap_content"
android:layout_height="match_parent"
android:layout_alignLeft="@+id/button1"
android:layout_alignRight="@+id/button2"
android:layout_below="@+id/button1"
android:layout_marginTop="24dp"
android:text="TextView" />
<Button
android:id="@+id/button1"
android:layout_width="wrap_content"
android:layout_height="wrap_content"
android:layout_alignParentLeft="true"
android:layout_alignParentTop="true"
android:text="Read cammad" />
<Button
android:id="@+id/button2"
android:layout_width="wrap_content"
android:layout_height="wrap_content"
android:layout_alignBaseline="@+id/button1"
android:layout_alignBottom="@+id/button1"
android:layout_toRightOf="@+id/button1"
android:text="Next activity " />
</RelativeLayout>
OUTPUT:
Conclusion:
We dicussed how to connect with database, and get notified on our andorid application.
AysnTask class was discussed in detail.
We have also used Select query to fetch data from the mysql data base. We learned how to display data using json objects.
Hope you have got some of the idea , on how to deal with data bases , using php, mysql and android. Besides this I would recommend you to have a look, different web-services . There are various web service which can be used to make android application, to bring ease to the human life. All of the web service almost have the same concept, as we have discussed, in fact it would be more easy for you to deal with that. You only need to follow their documentation, for applying different queries, fetching data etc.
All of the web services now a days provide their data as json, and xml which you can easily use for your android application.
[compare q=”Android course” gtm=”on” ct=”US” v=”grid” id=”eb78e3c6383a1dfa1c991d3325e5429b,8c40bdcb154068dca07598583f0ef25f,” ft=”fetchProducts” w=”auto”][/compare]


Hi, first great tutorial. But I have problem when I try to fetch data from database this returns null:
int id = json.getInt(“id”);
I defined in my database id as int(11). and output of running php file in chrome gives: {“id”:”2″,”svjetlost”:”20″}. Is there something I’m missing?
Awesome post.
Hi Trying to follow your tutorial, awesome that you make it!! But in button 2 you start a new intent with menuList.class, but you haven’t given that. Is it something that we’re missing? 🙂